Monday, December 23, 2019

Prime Rib

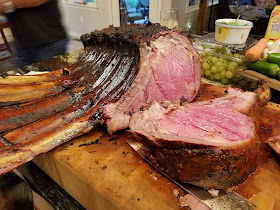
"Prime Rib."  What else can I say?  Whether it's the Christmas Season or you were just really hungry, Prime Rib is an excellent choice for any party, and it's a lot easier than you might think!


If you've ever thought, "I can't manage such a huge chunk of meat," then think again!  If you've stumbled to this page via Google, then please... I implore you... just ONE MORE click!!

I want to cook a whole BONELESS rib.

I want to cook a whole BONE-IN rib.

Friday, October 11, 2019

Jalapeno Jelly

Different cooks and chefs specialize in different disciplines.  Me?  I'm a meat guy, without a doubt!  Give me an apron, a board, a cleaver, and a carcass and I'm right at home!  But mention "Pastry" or "Canning" to me?  You may see my left eye twitch a bit, and my grip tighten on my cleaver...

Nevertheless, I will occasionally try my best to bake a pie or to pickle some veggies.  Here lately, my wife convinced me to try and make some jelly.  Sweet/Hot jalapeno pepper jelly, to be exact!  Here's the result.


Now, I'll certainly write up this recipe, but I'm going to make some assumptions:

Assumptions:
  • You have all of the equipment necessary to do some proper canning
    • Sterilization pot with rack
    • grippers
    • canning funnel 
    • jars, lids, rings
  • You are aware of basic canning terms and procedures
    • Sterilization
    • Head Space
    • Air removal
If you have all of these things and you're excited about getting your kitchen dirty and sticky in the name of GREAT pepper jelly, then read on!

You will need:
  • 4 Cups of finely diced mixed jalapeno chili peppers
  • 1 cup Apple Cider Vinegar
  • 1.75 oz package powdered pectin
  • 5 cups granulated white sugar
  • 6 8 oz canning jars

"What kind of peppers," you ask?  (Yes, I heard you).  That depends.  I like my pepper jelly HOT so I use a mix of jalapenos, serranos, and a poblano or two.  This is entirely up to you!  Mix in a handful of Habeneros if you want!  I would say that my mix is 3 cups of Jalapenos and a cup of mixed banana peppers and other chilis off the vine from my wife's garden.

Instructions

Using your canning equipment, sterilize six 8oz canning jars and lids in boiling water.  Meanwhile, chop and dice your peppers into the tiniest chunks you can.  Wear gloves, or you'll regret it the next time you have to wipe your eyes or go to the bathroom!  When your cans and peppers are ready...

Place all of the peppers into a large saucepan and kick the spurs to HIGH heat.  Add the vinegar and bring to a boil.  Stir for a minute or two.  

Now, remove it from the heat just long enough to add the sugar and the pectin.  Stir to dissolve and return it to the heat.  Stir constantly over a rolling boil for two minutes, after the sugar and pectin have completely dissolved! 

Is everything sticky yet?  it will be.... 

OK, things get fairly "time sensitive" at this point... Quickly (but carefully) ladle the jelly into your jars.  Leave about 1/4" of "head space" at the top.  If necessary, wipe the rim of the jar clean and drop on a flat lid, then screw on the ring/band tightly.  Set it aside and repeat with the rest of the jars.

Now, place jars back into the canner with the hot water. Submerge the jars so that the water completely covers the lids.  Bring the water up to a boil and "process" the jars for a period of 5 minutes PLUS your high-altitude adjustment value.  So, for example, if you live at 6,800 feet of elevation like I do, you'll boil the jars for a total of 25 minutes.. If you're at sea level, 5 minutes of boiling should set you right.

Remove the jars and set them on a towel on the counter.  As they cool, the lids will POP down and seal them!  They should be set and ready for storage, distribution, and/or consumption by the next morning!

NOTEYou may be tempted to "Double" this recipe.  DON'T DO IT!!  As nice as it would be to only have to bring out your canning hardware once for a double batch, science and chemistry are against you!  It is extremely difficult to get 3.5oz of pectin to heat/distribute properly and there's a 99% chance that your jelly won't set.  If you want Pepper Syrup, go for it.... but the smart money is on the one batch at a time!
Wednesday, August 21, 2019

Ahi Tuna Ceviche (Gasundheit)!

Looking for a super healthy appetizer or lite-lunch that is super tasty?  Look no further... The next time you spot some nice raw Ahi-tuna steaks at your local mega-mart, grab some up and make Ceviche!


"Ceviche" is a fancy word that describes the process of "cooking" (curing) raw seafood with citric acid.  ...and you thought all I did was BBQ?!

You Will Need:

  • Olive Oil (1 heavy Tbsp)
  • The juice from 2 large limes
  • 1/3 cup red onion finely diced 
  • 1/2 bunch of cilantro, roughly chopped (small)
  • 1 Fresh jalapeno, diced
  • 1 tablespoon toasted sesame OR jalapeƱo seeds
  • 1/3 Cup Roma tomatoes, diced
  • 12oz of sushi grade Ahi tuna diced into small cubes
  • 1 avocado, diced
  • Soy Sauce, salt, and pepper
This recipe could NOT be any easier, just do the following in order!

Glop the olive oil into a nice clean medium-sized bowl.
Add the lime juice, and stir. 
Add the onions.
Add the Cilantro.
Add the Jalapenos.
Add the Seeds.
Add the tomatoes and GENTLY stir, stir, stir!
Now, get out your sharpest knife and carefully cut your Ahi-steak into 1/4" cubes.  Trust me, this is so much easier with a sharp knife.  If your "best knife" is that rusty old thing with the faded wooden handle that you've run through the dishwasher a thousand times, you're due for an upgrade!
Dump the tuna cubes into the bowl and gently fold them into the mix.
The Avocados are last because they're so fragile.  Slide them in and gently fold them into the mix.
Finally, shake on a fairly generous amount of soy sauce.  Taste it.  Use regular salt and pepper to do any "fine tuning" if necessary!
Serve this goodness on little brioche toasties, good crackers, chips, or just eat it with a spoon!!

Monday, August 19, 2019

Corn Casserole (or... "Crock Pot Corn Plop!")

What's better than Corn Casserole?  EASY Corn Casserole! 


Like most people, you probably have a can or two of creamed corn in your pantry.  Creamed corn in a can is NOT the most delicious thing in the world (on it's own).  If you want high quality creamed corn, there's a recipe for that and it's quite good if you make it from scratch.  So... let's take a moment to clean out your pantry a bit, and turn that stuff into something GOOD!

You Will Need:
  • 3 eggs
  • 2 (15-ounce) cans creamed corn
  • 5 Cups corn kernels (frozen or fresh, uncooked)
  • 2 boxes of Jiffy Corn Muffin mix (8.5oz each)
  • 1 Cup sour cream
  • 1/2 Cup cream cheese 
  • 1 Stick butter, melted
  • 1 Tbsp Creole Seasoning
  • 1 Tsp Crushed red pepper flakes (I like Chipotle flakes)
  • 1.5 Cups shredded cheese (mix some cheddar, jack, and/or other melting cheeses)
  • 1/4 Cup chopped roasted green chilies (Pueblo Dynamite or Hatch chilies are best)
I don't know how to ask this with any level of sensitivity so I'm just going to blurt it out; have you purchased condoms for your crock pot?  You should.  Goodness knows what that crock is doing while he's being stored under the cabinet for so many days between appearances!  Seriously, this recipe gets pretty sticky so you'll want a proper liner for your vessel!  I sprayed my liner with non-stick cooking spray, just to double down on making it easy to clean later.

Ok, get a big bowl out and get ready to corn!  First, drop in the eggs and beat the crap out of them.  Then add the creamed corn and stir some more.  Add the corn, stir and fold.  Add the boxes of Jiffy Mix.  Stir... Do NOT give me grief about my crazy paddle!  It's 2019 and paddles are completely gender-neutral!  This one identifies as a big burly dude, so... Anyway, stir in the corn, then the sour cream, and the cheeses.

Add the spices and the butter, then give it one more stir.  Set it aside while you go to work on the chilis.

Let's talk about chilies for a minute; If you buy a can of "green chilies" from the store, you'll get a flavorless mass of green chopped "goo."  Don't do it!  Get yourself some fresh roasted chilies that carry the balance of heat and flavor that you like the most.  Living here in Colorado, I'm lucky to have access to an array of chilies out of Pueblo.  I like the "Dynamite" chilies for their extra heat.  Simply roast them over the flame in your grill to get a nice char, then let them cool, and dice them up!  Using fresh chilies makes a world of difference in this dish, so make the effort!

Once you've stirred the chilies into the batter, scrape it all into your Crock Pot, and gently tamp it all down.  Add the lid and set it to LOW for 5-6 hours, or HIGH for 4 hours.  
This dish will cook from the outside in, so you will need to use the center as a guide.  When the center of the dish is "set" and edges are brown and crispy, it's time!!