Monday, April 14, 2014

Tools You Need, and Tools You Don't

Looking back over the years, I think I've bought, used, tried, tested, and ultimately thrown away more BBQ tools and toys than most people will ever use.  This is not something I'm proud of, but it's knowledge I'm proud to share!


There are a zillion crazy tools out there.  For pity-sakes, do you really need a spatula that says, "MMMmm that looks tasty" every time you flip a burger?  That's the sort of thing that belongs in the garbage, right next to the "Billy-Bass" singing fish that you never should have hung on your wall. Here are the tools that I consider "Essential" and I'll tell you why:

  • Charcoal Chimney
  • Thermapen
  • Remote Temperature Monitor
  • Tongs
  • Seriously... just Tongs
  • Knife / Cutting Board
  • BBQ Grill Mat
  • Non-stick foil

Charcoal Chimneys are awesome!  You can start a giant pile of charcoal in 20 minutes with a single match and two sheets of crumpled newspaper.  Lighter fluid has its place in the world, for lighting bonfires or garbage piles on fire, but lighter fluid should never be used anywhere near food!  Also, avoid the "light the bag" style of charcoal with the briquettes that are saturated in lighter fluid.  The smell of chemicals will permeate your food and that's just bad for all kinds of reasons, chief of which is, "your food will taste horrible."  I burn through a charcoal chimney at the rate of about one per year... They also double as a mini-stovetop if you ever need "jet-engine" heat for Blackening steaks in a cast iron skillet, or if you ever need to sear some sushi grade tuna, rare.

I would be lost without my Thermapen!  The $90 pricetag bothered me, but I thought back and calculated that I'd thrown away at least $200 worth of broken, inaccurate, burned out, and otherwise useless probes and thermometers.  This thing is hyper-accurate and scary fast.  It uses an actual two-wire thermocouple rather than a digital sensor, and the pickup is in the extreme end of the tip so you can literally see what's going on in your food, whether its deep inside a ham near the bone, or just under the skin of a Cornish hen.  Get one.  Most "instant read" thermometers need a minute or two to settle on a final reading.  Any BBQ chef will tell you, you don't want to raise the lid on your pit for two minutes... leaking that kind of heat out will cost you another 20 minutes of cook time on the back end.  This thing will tell you in 3 seconds or less, EXACTLY what the temperature of your food is.  I wouldn't cook without it.

What's so important about a remote temperature monitor?  I believe that the trouble most people have in grill-cooking is knowing when to take the food OFF of the heat.  A chicken breast that is 180 degrees is definitely safe to eat.  It is also dry, tough, and something I wouldn't serve to my guests.  A chicken breast that is 165 degrees is equally safe to eat, and will be super tender, juicy, and talked about long after the meal is over.  For bigger meats, most connective tissues don't completely break down until they reach 180 degrees.  Briskets and Pork Shoulders are done and safe to eat at 140, but they don't reach their optimum textures and "pull-apart goodness" until they touch 190, deep inside the muscle.  The only way to know for sure when your meat is delicious, but not burnt, is to jab a probe into where it counts and to watch it.  My ThermoWorks remote monitor has two inputs for two probes, so I can monitor two cuts of meat at the same time.  It also has alarms to let me know when things are close to being done.  The newer version of this monitor has bluetooth and will talk to your home wi-fi so you can use your cell phone to monitor the grill and food temperature from anywhere in the world!  This is useful for getting you out of the ballet or the opera with your wife... "Honey, the ham is done, I got to GO!"

I use Tongs.  I don't use spears, spatulas, claws, mitts, gloves, forks, or pokers to handle my food while it's on the grill.  There are several reasons for this, but mostly it's because I don't want to poke any more holes in my food than is absolutely necessary.  Nothing will ruin a good link of sausage more quickly than jabbing holes into it to let all of the juice run out!  If your burgers are too "stuck" to the grill for you to use tongs to flip them, then you shouldn't be flipping them yet, anyway, so a spatula wouldn't help you.  Get yourself a nice pair of long stainless steel tongs (NOT silicon, because silicon won't grip your food and that's the whole point) and start using them!

I am just amazed, every time I ever help a friend grill, at the complete lack of cutlery I encounter in most of their kitchens.  Lots of people have "that one big knife we got from our wedding" or from Uncle Fred or whatever, and it's usually in a drawer somewhere with some rust on it.  *SIGH* get yourself a good knife!  Bigger is not better, "Sharper" is better, so spend some money on a knife with good steel, that will hold a good edge, for a long time.  Do NOT get an "eversharp" or other knife that "never needs sharpening!"  If you look closely at these knives, they have serrated edges (like hacksaw blades) that will cut almost anything (even nails and metal), but they'll tear your food up.  You want "slices" of things, not "hacked portions" of food adorning your serving platters.  Spend some time in the store handling different kinds of knives, because every hand and every preference is different.  I like German knives, they tend to be a bit heavier (I like that) and they are balanced well in my hand.  Your mileage may vary.  Also, get yourself a good, heavy, stable, cutting board.  You don't want it slipping around your counter while you have a sharp knife in your hand, and you want it big enough to hold that 18lb brisket.  Get a nice one and you'll be surprised how often you use it.

I find a new use for my BBQ Grill Mat almost every time I use it.  Here it is in action, with a mess of sliced onions in oil, salted, and smoking away in the corner of my BBQ pit.  These mats withstand some extreme temperatures, they're non-stick, and they keep food from falling through the cracks.  How versatile are they?  I've "fried" chicken wings on mine, cooked bundles of asparagus, mushrooms, fajita peppers, and I've even smoked corn casserole and other food that you wouldn't ordinarily plop onto the hot grill grates to cook.  Mine just "lives" in the grill.  I don't take it in for washing, simply because it heats up to 500 degrees every time I use it.  Wipe it down once in awhile.  You can also cut it down to a small size or "round it off" to match your grilling surface, if you want to.  Find them on Amazon.

Last on my list is non-stick aluminum foil.  Grilling usually means "sticky."  Whether tis a dry rub with brown sugar or a bbq sauce that you mop onto your food, most things that come off the grill like to stick to other things.  Aluminum foil that has been treated with a non-stick surface is a miracle of modern technology!  Use this one time on a stubborn sticky food and I promise, you'll never buy regular foil again!  Want to bake/smoke your bacon on the grill?  Non-stick foil.  Don't want to leave your Salmon skin stuck to your grill-grates so that food from your cooker tastes like fish for the next week?  Non-stick foil...

Do you have a favorite tool you think I should be using?  Leave you comments here!  I'm always up for more!


Thursday, April 10, 2014

Secrets of Salmon

Grilled Salmon is a very popular dish in restaurants, but it's feared at home.  Why?  Lots of reasons...

"Doesn't it stick to the grill?  How do you flip it over?"
"What about the skin?  Should you grill it or remove it?"
"How do I know when it's done?"
"A whole filet of salmon is too expensive to ruin on a hot grill!"

Fortunately, deliciously grilled salmon is super easy and I'm here to share a few secrets that will, hopefully, inspire you to try it!

You will need:
  • 1 Whole Filet of Salmon (Skin ON)!
  • Dry Rub for the fish (equal portions of each):
    • Sea Salt
    • Brown Sugar
    • Smoked Paprika
    • Fresh Dill (chopped fine)
    • White Pepper
  • Olive Oil
  • Lime Juice
  • NON-Stick Aluminum Foil

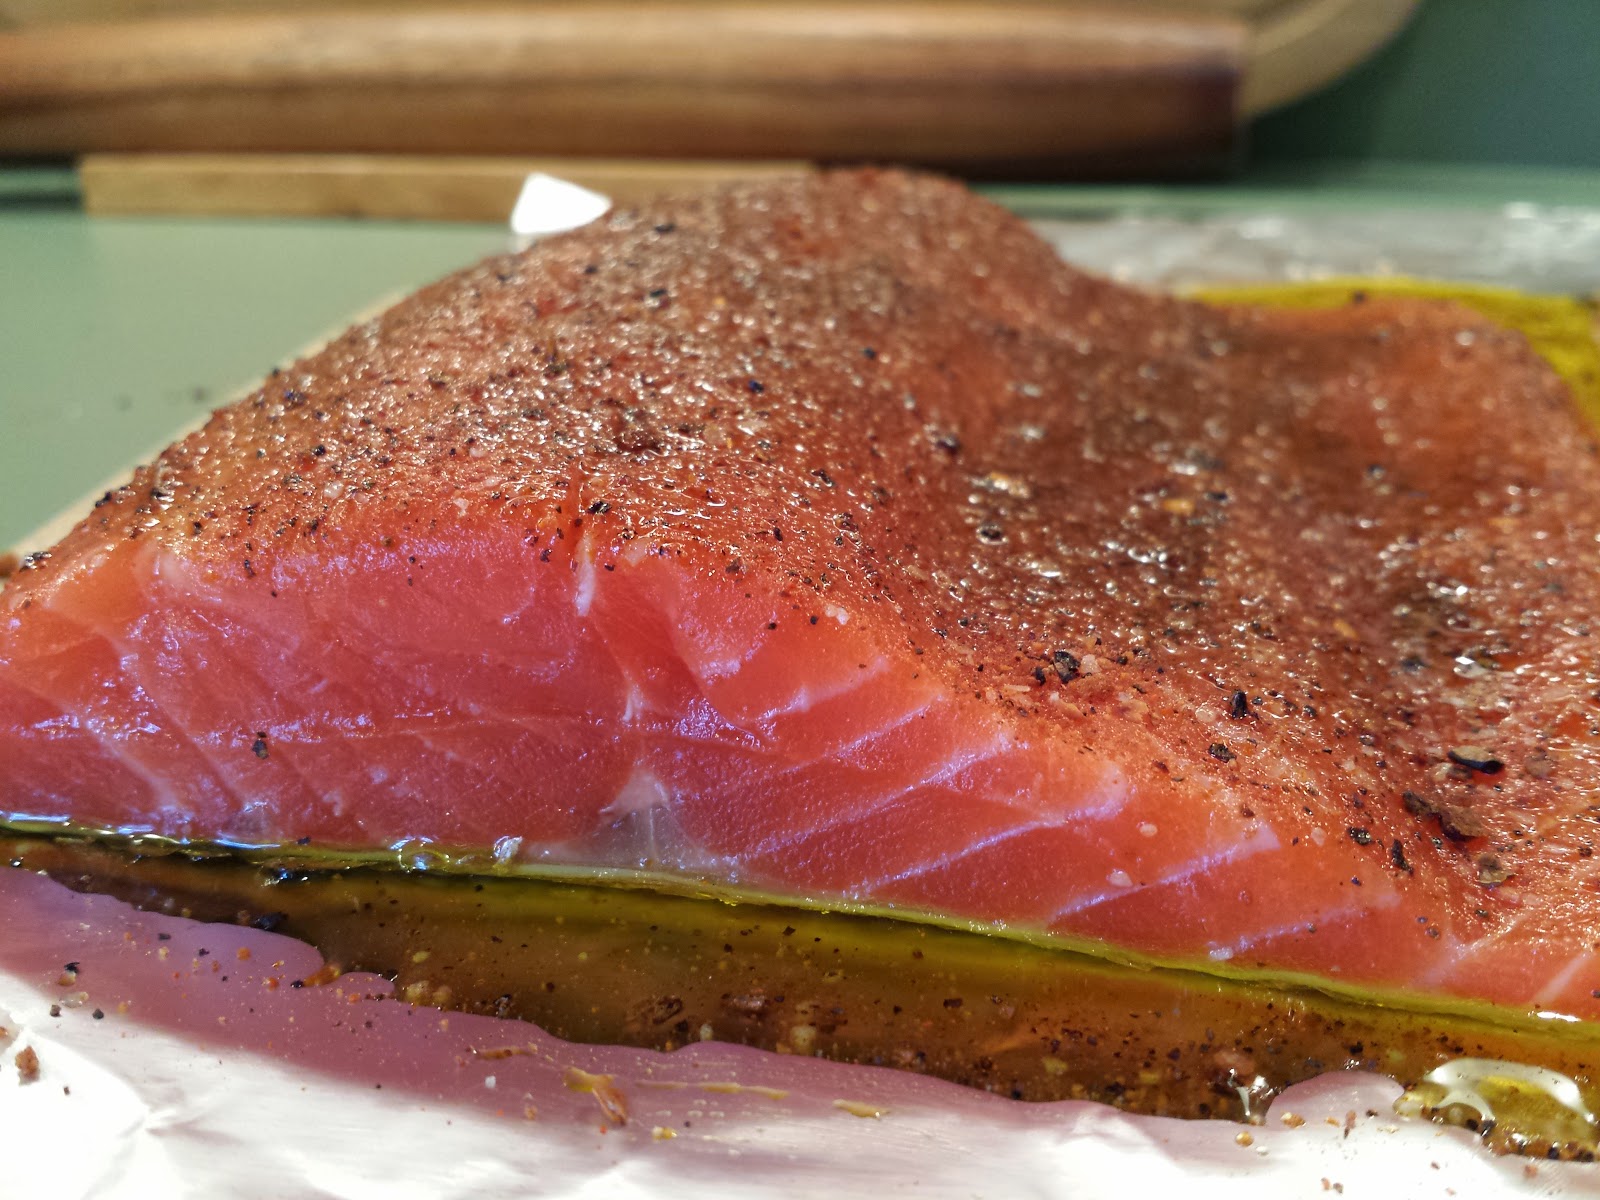
Stretch out a length of foil that is 2x the length of your fish, and double it over.  You'll want two layers of foil under the skin of your fish when you slide it onto the grill.  The answer to the question, "How do I turn the fish over without it sticking to the grill?" is simple; Don't turn it over!  Burp some olive oil onto the foil and lay your salmon (or any other fish, really) on top.  Slide it back and forth a bit to lubricate everything well.
Pour a tablespoon (or so) of olive oil into your hands and rub down the salmon filet.  You want enough oil on the fish to "hold" the rub, but you don't want so much that it saturates the fish.  Squeeze the juice of 1 lime into a small bowl and add a liberal amount of your dry rub.  Mix the paste well and rub it all over the fish.  The acid in the lime juice will actually "cook" the flesh of the fish a little bit, and color the meat a whiter shade than the surrounding area.  So; you don't want to have heavier concentrations of it on some parts of the filet, but not others.  Be as "even" as possible in your application of the lime & rub paste.

Now let the salmon sit, unmolested in a dark corner, while you build your fire.  The fish needs to be at room temperature when it hits the grill, so be patient.  It will darken in color and some moisture will leach out of the fish... this is normal.  You'd leach moisture too, if I covered you with salty lime juice!

Once your fire has warmed up and the grill is pre-heated, carefully slide the foil off of your cutting board and onto the cool side of the grill.  Grab the corner of the foil with some long tongs, and slide it over to the hot side.  You'll notice that non-stick foil is SLIPPERY, so it will slide easily all over the grill.  It will also slide right off of your cutting board, too, so don't drop the fish! Close the lid to the grill for 7 minutes.  Let the smoke flavor the fish and let some heat build up to "bake" the filet. 

After 7 minutes, lift the lid and check on it.  Several things are happening at this stage:
  • A light crust will be developing on the top of the filet, and the rub will darken in color
  • The oil will be bubbling around the edges of the fish, this is normal!  The double layer of foil and the skin on the bottom of the filet will protect the meat from searing or burning.
  • The meat is slowly coming up to temperature.
If you want to cook it a bit more slowly, and you want to add some more smoke flavor, simply slide the fish over to the cool side of the grill and close the lid.  The inside of your grill should come up to 400+ degrees and now you're essentially "baking" your salmon in a nice smoky environment.  Check the fish's temperature every 5 minutes or so.

When the inside of the fish hits 140 degrees, it's time to pull it off the grill.  Slide the filet off of the foil and back onto your cutting board.  gently, slide a knife under the skin on the bottom of the filet.  The meat should slide right off of the skin, in one whole piece, easy peasy!  Slice the filet, cross-ways, to portions of your choosing.  The meat should be firm, opaque, tender, and DELICIOUS!  Serve with a slice of lime and some fresh dill to garnish.

Thursday, March 20, 2014

My New Smoker

Recently, I bought a new primary oven/stove for the house (out of necessity), to replace an older model that finally gave up the ghost.  I weathered quite a bit of anxiety about it (good ones aren't cheap) and we finally chose a nice model and got it installed.  A couple of months later, I was looking at my bbq pit-smoker/grill that was sitting outside on the deck and I thought, "It's time."  Looking back,  my wife and I agreed that I (we) cooked more food on more days outside in the smoker than we did inside with our oven, so it was easy to justify the "need" for a new smoker, but the justification for the "expense" of a new smoker took a bit more doing.
My old grill, "Old Faithful"

I spent almost double the amount of money on an outdoor cooker than I did on our nice indoor stove/oven (the "good" one, with two levels of convection and a steam cleaning cycle).  Why!?  Well, let's walk through the process.  Hopefully, this will help guide you if you're in the market for a grill or smoker.

What I needed:
  • I needed something that could get hot enough to sear a steak, and to grill burgers, chicken or salmon.
  • Something that could support enough hot coals to get a cast iron skillet white-hot so I could blacken steak and fish, and cook pizza.
  • Multiple chambers so that I could slow-smoke briskets, pork shoulders, racks of ribs, or whole chickens, turkeys, or other big hunks of meat.
  • Something that could stand up to heavy use (multiple times/week) in all 4 seasons.
  • Enough surface area to cook for 50-100 people at a time (because that's how I roll at least once a month).
What I wanted:
  • Something that could calm the fires of my testosterone occasionally, without sending me to prison.
  • Enough surface area and head-room to cook for a thousand people at once!
  • Something I could fit an entire animal on, at one time, like a whole pig or a lamb on a spit!  Perhaps some Woolly Mammoth ribs...
  • A completely efficient wood-burning smoker that ran forever on one stick of wood!
What are my options?

Start looking around and you'll discover that every home improvement, hardware, and appliance store is excited to sell you a grill.  I mulled over options from four categories, the Kettle, the Egg, the "Classic" grill, and the Offset Smoker.  I've described the advantages and disadvantages to each of these in a prior blog post, so I won't belabor the point again here... I decided on an offset smoker from Yoder Smokers, in Yoder Kansas.

What did I pick?

The most economical cooker that satisfies every single one of my bulleted "needs" above (as well as half of my "wants") was a Yoder "Wichita" model (loaded).  Sure, it looks just like the offset smoker you can buy at Walmart for $149.00 but there are a few significant differences... First, this is hand-welded 1/4" steel, and it weighs in at just under 660lbs.  It has a lifetime guarantee against burning out the bottom.  The stamped tin/steel grills you find at Walmart won't last a single summer of heavy use, and they leak heat like crazy so, you'll use 10x the charcoal or wood to cook the same amount of meat.  Besides, who wants a grill made out of metal so thin you can bend it with your bare hands?  Other goodies in the Yoder package:
  • The firebox is easily large enough to function as it's own charcoal grill, with over 340 square inches of grilling space.
  • The main cooking chamber has over 1,300 square inches of surface area to pack with meat!  Most "Classic" propane grills max out at about 600.
  • A heat-dispersion plate diffuses the direct heat from the firebox and distributes it more evenly throughout the cooking chamber to eliminate hot-spots and to turn the chamber into a predictable "oven" without the need to constantly rotate everything to get heated evenly.
  • Multiple thermometers allow you to keep a very close eye on the space around what's cooking.
  • The counter-weight on the door makes sure the heavy door won't slam shut on you, and it makes an awesome place to stick your magnetic food thermometers, or to hang your hat.
  • A Probe-port allows you to use a temperature probe during the cook without having to prop the door open.
In the end, what drove my ultimate decision to buy this particular pit, were the people at Yoder.  I visited the factory (20 miles outside of Wichita, KS).  I was impressed.  Here's a hard working group of folks welding and creatively building a quality product in America's heartland, and they each had time to stop what they were doing to shake my hand to talk about what their role was.  It was obvious to me that they took pride in their work.  Welding up all kinds of cookers from small pellet smokers to huge trailer-mounted custom rigs for restaurants or other businesses, Yoder has been around BBQ for decades.

I'd spoken to them on the phone a number of times prior to my visit, and upon my arrival I was excited to see that they'd built my custom pit, and had it all ready to load (complete with a custom ash-rake with my initials welded into it) into my truck.  They didn't even require a paid deposit... There is still a business in America that builds products here with American steel and American labor, who will still do business with a telephone-handshake?  Yes, there is... and it's the people at Yoder Smokers!  More pics from my visit, below.

It glows in the dark!

Damper Control

Firebox grill grate

Multiple shelves

Hand Welded, excellent seal

My own personal ash-rake!

Custom giant

Another giant!


Thursday, March 13, 2014

Oxtail Chili

Before I give you my latest award winning Chili recipe, I feel the urge to gather my soapbox and to say a few words about Chili.  I believe with all of my heart and soul that the first person to put beans in his chili, did so because he ran out of meat.  Sure, beans are "traditional" now, but they shouldn't be.  A "Chili" is a pepper, after all, not a bean.  Season a pot of meat with enough Chili Powder, and eventually you'll taste more chili than meat so, the dish is really all about balance (and the chili peppers).  On a purity scale from 0-10, a pure-bread Texan would rate a "10" if he were to slice the meat up into chunks so tiny, it would almost cook completely away, leaving a bowl of deeply flavored thick red chili "sauce" (this is where the phrase, "A good bowl of red" came from).  A Vegan bowl of "Meatless White 3-bean Chili" would earn you a zero. 

If you ask me, a hearty bowl of chili turns into a mild bowl of soup as soon as you drop a bean into the pot.  So, don't do it... I fall somewhere around a 7 on the purity scale.  You'll never find beans in my chili, the meat should always play 2nd fiddle, but I will add some onions, tomatoes and other spices to the mix to bring a bit of texture.


Here is the recipe that recently won me a "1st Place" in the "Beef" category, as well as "Best Overall" at the cookoff:

You Will Need:
  • 5-6lbs of Oxtail Medallions
  • 56oz of canned diced tomatoes, (I used the “Fire Roasted” kind)
  • 4 Tbsp tomato paste
  • 2 Large yellow onions, diced
  • 2 Red bell pepper
  • 1 Green bell pepper
  • 5 Heaping Tbsp (yes, TABLESPOONS) Chili powder (I like homemade)
  • 8 Cloves garlic, minced as fine as possible
  • 2 Dried Chipotle chili peppers
  • 6-8 Cups beef stock from your oxtails
  • 4 Slices of uncooked bacon (chopped into tiny tiny bits)
  • 2 Tsp Mexican oregano
  • 2 Tbsp paprika smoked
  • 2 Whole jalapeno chili peppers, diced

Oxtails can be tough to find.  Ask your local meat cutter for a source if your store doesn't have them.  They're fantastic for making beef stock, and the meat is similar in texture to Barbacoa.  It's very flavorful.  The only hassle is, there is a LOT of connective tissue to deal with and, of course, bones.  I bet you didn't know a cow's tail had so many bones... Before you even think about chili, you'll have to cook the meat off of those bones and build some stock.  This takes time.  LOTS of time.  Your patience will be rewarded!
Place all of the oxtail medallions into a stock pot and add enough water to cover them by ¼ inch. Add a cup or two of red wine if you have some handy (who doesn't?).  Add a few heavy pinches of salt, bring it to a boil and reduce that to a simmer.  Let the oxtails simmer for at least 6 hours, until the meat will fall off of the bones.  Pull the meat off and save it in a bowl, discard the bones and keep the stock.  Skim the fat off the top, these beauties will produce copious amounts of it.
Now, for Chili!  Sweat the bacon in your stock pot. When the bits are nice and brown and crispy, remove the bacon and leave the fat. Add all of the powdered spices (except for the oregano). Stir it into the bacon fat and cook over Medium High heat for 1 minute to wake up the oils in the spices and Chili powder. 

Add the onions, peppers, jalapenos and garlic.  Saute all of the veggies, stirring frequently for 15 minutes or so.  Add tomato paste and keep sauteing.  

Pour on your diced tomatoes. Stir.  Add the Oxtail stock and bacon bits to pot.  Stir.  Add the ox tail meat, along with the chipotles and oregano. Continue to heat until boiling, then reduce to a simmer and let it simmer there, with the lid OFF, for about four hours.  Leaving the lid off will allow some of the liquid to boil off and the sauce to thicken.   

After 4 hours or so, everything should have come together very nicely!  Remove your Chipotle Chilis, as their flavor has now been imparted to the mix and you don't want your diners to eat a whole one of those... As a final step, I like to Cool the chili when it’s done so the fat will solidify into a disk that is easy to remove.  Chili is always better when it's reheated the second day, right? 

Since this recipe calls for two "Cool Down" periods, I recommend starting it a day earlier than you plan to serve it.  If you're wondering if it's worth it, I promise you; you've never tasted anything like it in your life and it's fantastic!  Spicy, but not too much so; smoky, soft with a bit of "bite" for your tooth, and deeply flavored.  You'll need a block of cornbread to sop up any leftovers.

Thursday, March 6, 2014

Pulled Pork

So, I tried Quinoa for the first time this week; Heads Up, people.. it's VILE!  I did some reading on Quinoa and found that since the U.S. demand for it has accelerated beyond the speed of light, this poor little grain derivative has been taken from it's Peruvian mountain soil and been mass produced in other, less hospitable places, making it the vile nasty dirt-filled fungal mess that you can now buy at the local grocery.  These facts failed to deter a pitch-fork wielding mass of Vegans from yelling at me and calling me names.  Sticks and stones... For all of their posturing and whining, all they managed to do was to convince me it was time to cook something very muscular and very big; Pork Shoulders!
Pulled Pork is a heavy favorite at any BBQ restaurant and while you could certainly achieve tender pork goodness by slow cooking it in a crock-pot, why would you want to let such a pinnacle of porcine purity cook by simmering it in its own fat?  Infuse it with smoke, I say!

You Will Need:
  • At least one 8-12 whole "Bone-In" pork shoulder
  • A squeeze bottle of yellow mustard
  • 1 Cup of Dry Rub per shoulder, equal amounts of:
    • Fresh Chili Powder
    • Brown Sugar
    • Kosher Salt
    • Black Pepper
    • Paprika
    • Cumin

Notes: Let's talk for a minute about how many shoulders you should consider smoking.  A healthy pork shoulder should weigh in around 10lbs. You'll render at least 2lbs of fat out, and the bone weighs a bit, so let's say that you end up with 7lbs of meat to serve.  According to reason, that should serve 28 people a 4oz pulled pork sandwich.  However.... if you put a tray of 7lbs of this glorious dish in front of 5 hungry teenagers, it will completely disappear.  So, purchase accordingly.  Also, it's important to find bone-in shoulders.  If the shoulder has been de-boned, it's been fileted open so the bone can be removed.  You can roll it back up and tie it, but it just won't behave the same way in your smoker once it starts to cook and swell up, and render fat, etc.  Find a bone-in shoulder, it's worth the effort!  Warehouse stores (Sam's, Costco, Restaurant Depot) usually have bone-in pork shoulders available.  They come two to a pack and that's a perfect place to start.  It's funny to me that the shoulders in each pack obviously come from different pigs... how does that happen?


Let's get started!  Open the pack and rinse and dry your pig using cold water and a clean towel. Use a sharp knife to cut away any obvious chunks of fat.  Keep in mind, the thing is riddled with fat and that's a good thing, so don't spend time trying to cut it all out; you'll lose.  Just cut off any large pure nodules that you might find offensive.  Remember, as the fat and connective tissue slowly dissolve and render away, it will leave the meat with the glorious flavor and texture we're looking for as BBQ providers!
Squirt the shoulder generously with yellow mustard.  Smear the mustard all over and into the shoulder with your hands.  It will be messy... do it anyway!  Rinse your hands and shake on a generous amount of your dry rub.  Cover all sides and surfaces.
Wrap your shoulders in plastic-wrap and let them "marinate" in the refrigerator for several hours or overnight.  This is when the magic happens!  The salt (and other spices) in the dry rub will dissolve into the mustard, and the meat on the shoulder will react by leeching out some fat and moisture and a gooey "bark" will form.  This gooey bark will eventually become the dark and smokey crust that pulled pork is famous for!  On the day of the smoke, pull the shoulders out of the chill-chest and let them rest on the counter while you build your fire.
Empty the grease bucket under your smoker, things will get messy and you do NOT want an overflow!  Your dogs do... you do not.  Place your shoulders on your smoker, and make sure the temperature is 225 degrees.  I strongly suggest the use of a temperature probe because of the "Stall Factor!"  Your target temperature is 200 degrees.  This is when the last of the collagen and connective tissue will finally break down and melt away.  How long will that take?  That's the million dollar question because pork shoulders are stubborn!  Some are more fatty than others and they take longer.  You'll see them come up to 160ish degrees fairly quickly, but then they'll stall!  They'll stay at 163 degrees for hours, and you'll swear that your fire went out, or that your temperature probe is broken, or that God made a mistake when he gave you dominion over the animals.  Stick with it!  Be patient, for it is during this "stall" that the best of things is happening!  Fat is rendering away, unwanted chewy tissues are breaking down, lean meat is cooking up, etc.  Just let it stall... eventually, she'll climb up over 170 and continue on her quest for 200.

If you take your shoulders off the smoke during the stall, thinking, "It's been 8 hours, these MUST be done," you won't be "pulling" your pork, you'll be "chopping" your pork with a cleaver or knife.  The meat will be done, but it will be very chewy and it won't have that "melt in your mouth" texture that will set you apart from the competition.  Patience.

When you take the shoulders off, cover them with foil and let them rest for an hour or so.  They'll be too hot for you to pull anyway, so you might as well let them rest for awhile.  Take the foil away and the first thing you'll want to do is to remove the bone.  If things are as they should be (internal temp. is 200, pork is well-rested), you should be able to grab the end of the bone with two fingers and literally slide it right out of the shoulder.  It should come out cleanly and neatly, and your dogs will want it, BAD!  I let my dogs have one each, after all; their noses have been driving them crazy during the cook for the last ten hours or more so...  Grab a fork and simply start pulling the meat apart, using a knife if you want to chop it into smaller pieces.

Personally, I like to heap a pile of this stuff on a fresh bun with a bit of coleslaw and honk it down!  Some like to cover it with BBQ sauce and some like to "hover" near the cutting board, just to steal pieces and eat it, right out of the pan!  It freezes well, so you can portion it out for future lunches.  Nothing tells the rest of the office, "you're missing out," like a re-heated pile of pulled pork!  You'll be the scourge of the break room, and that's a good thing!


Monday, February 24, 2014

Cranberry Custard Pie

The other day, I noticed that I had an extra frozen 9" pie shell in my freezer.   It was sitting on top of a giant bag of fresh-frozen cranberries.  At that moment, I was holding a 3lb pack of bacon to put in the freezer, and the freezer was full so... something had to go!  It was clearly time to make pie!

You Will Need:

  • A 9" deep dish pie shell (thawed on your counter-top for 15 minutes)
  • 1.5 Cups of fresh cranberries
  • Some Cardamom
  • Some Cinamon
  • An Egg
  • 1 Cup of Heavy Cream
  • 1.5 Tbsp Flour
  • 1 Tsp Vanilla
  • 2/3 Cup Sugar
This pie is tricky.  It's super easy to put together, but it will require some diligent attention while it's in the oven.  More on this, later...


First, pour your cranberries right into the pie shell.  Leave them on the counter somewhere to thaw, if you haven't thawed them out already.  The berries should thaw in an hour or so, and it's super important that they aren't cold or frozen before you bake them, so don't skip this step!

While the berries are thawing out in your pie shell, sprinkle them with a couple of generous spoonfuls of sugar, and then shake on a dusting of cinnamon and a dusting of cardamom.  Walk away and let the sugar start to work its magic on the berries.  You'll start to smell this magic in ten or 15 minutes.  While you wait, you can pre-heat your oven to 425, and use the Convection setting if you have one.

Toss an egg into a large bowl and beat it to death with a good whisk.  Beat it some more.  You want a nice bright yellow uniform egg to start your custard with.  Add the Vanilla and the sugar and beat, beat, beat until you have a nice, smooth consistency.  I probably could have used my KitchenAid mixer, but I wasn't in the mood to wash it, so... I grabbed the whisk.  Lightly sprinkle the flour on top and beat it some more.  The flour is here to help thicken the custard, don't forget it! 
Add the heavy cream, a dollup at a time, and mix it slowly with the egg batter.  Your goal is to dissolve all of the sugar and to come up with a smooth custard.  You'll know its ready when you scrape your whisk across the bottom of the bowl and you don't get any sugar residue sticking to the wires of your whisk.

When you're sure your berries have thawed out, pour your custard on top of them.  They'll float, and that's a good thing!  They'll bob right up to the top of the custard and float there, like it was a glorious cream-filled hot-tub or something.  This is exactly what you want! Put the pie onto a cookie sheet so you can move it around without slopping the custard over the edge.  Nobody likes that... Put the pie into your 425 degree oven, and  Close the door and immediately lower the heat to 350!  Set the timer for 45 minutes but don't leave your kitchen because now is when things get "tricky!"

Several things are going to happen to this pie during it's stint in the oven.  First of all, your custard will try, desperately, to set up and get firm.  Meanwhile, as your berries get hot, they'll "pop" and release their glorious cranberry juices into the custard, interfering with it's attempt to firm up.  It's like trying to work up some muscle at the gym, while some fool walks around selling girl-scout cookies... it's tough to reconcile!  In any event, it will eventually come together, you'll just have to watch it like a hawk.

After the 45 minutes are up, slide the rack out of the oven and give it a look.  If the cranberries haven't popped yet, slide it right back in and wait another ten minutes.  That's what they get for being lazy!  If they did pop, give the pie a quick jiggle and assess how "firm" the custard it.  It should jiggle a little in the middle but be fairly firm around the edges when you pull it out of the oven, and it should like the picture here to the right.  If it's still too loose, don't be afraid to put it right back in for another ten.  Show those berries who's the boss!  When it's finally firmly set, take it out and let it set and rest for at least an hour, or it will run when you cut into it.  Letting it rest in the refrigerator is even better.


This pie smelled terrific when it came out of the oven, I can't even tell you how good it was!  It's a mix of egg custard, cinnamon, cranberry, and notes of caramel and cardamon... Wow!  It is sweet and tart at the same time, and very smooth.  I highly recommend making two at a time whenever cranberries are on sale!

Sidenote: The original pictures for this recipe got destroyed.  My good friend Holly made this recipe and was kind enough to take/send new pictures (YAY, Holly)! 


Monday, February 17, 2014

Simple Grilled Shrimp

Shrimp are so versatile and so easy to cook.  My favorite way to eat them is, of course, grilled!  Grilled shrimp carry a "bonus" with them in that they're even better the next day out of the refrigerator in an omelet or as a low-calorie pre-breakfast treat!


You will need:
  • A bunch of shrimp.  2-3lbs should do it.
  • 3 Tbsp Olive Oil
  • Juice of 1 large lime
  • 1 Tsp of yellow mustard
  • 4 cloves of garlic, crushed and chopped fine
  • A good handful of a dry rub that contains equal parts of salt, pepper, chili powder, and brown sugar

The first thing you'll need to do is to find some good shrimp.  For grilling, you'll need some big ones.  Shrimp are sized by a number that can be confusing, the number indicates how many of those particular shrimp it would take to make a pound.  The smaller the number, the larger the shrimp... so if you had some #4s, you'd have shrimp that were 1/4 pound each, and so on.  I like the 13s or bigger for grilling (also called "Colossal").  You can grill smaller ones, but it takes time and care to season, skewer, cook, and manage so many of the little buggars.  So, find some #10-13s and peel them so that all that remains are the tails (tails make great handles).


In a bowl, use a whisk to combine the oil and lime juice.  A touch of yellow mustard acts as an amazing catalyst to bring these two together into a lovely smooth vinaigrette.  Add the garlic.  Now, pour the mix over the shrimp in a larger bowl and mix to coat them.  Shake on your dry rub, and don't be shy!  I had just started shaking on the rub when I took this picture, you'll know you have "generous coverage" when you see it in your bowl...

Pour all of the rub-covered shrimps into a zip-top bag, remove as much of the air as you can, and stash them in the refrigerator while you get the grill going.  You can leave them in there overnight if you want, but no longer than 12 hours.  A minimum of 1 hour is great.


While your grill is pre-heating, you'll need to stash your adult beverage in a cool place.  Living in MN affords me a convenient snow-Koozy which I frequently take advantage of.


While your grill is pre-heating, you'll need to skewer your shrimp.  It pays to lube up your skewers first with a light coating of olive oil, just dab some into the palm of your hand and wipe the skewers through the oil.  This will make the removal of the shrimp a much easier task later! 

Shrimp cook extremely quickly, 5 minutes over a decent open flame (2-3 minutes per side) will render them done, tender, and very very tasty!  If you grill them longer than that, they'll shrink into little rubbery disks and nobody wants to eat those, even if they're trying to be polite about it.  So... what you want out of your grill is a nice hot open flame.  Lay the shrimp down and close the lid to build up some smoke.  Let the shrimp sit in the smoke for 90 seconds, then open the lid and watch them for another minute to make sure there are no flame ups.  Flip and repeat on the other side, and you're done!  Carry in the skewers and slide your shrimp-army into a presentable dish, garnish them with some chopped green onion, and serve immediately!