Tuesday, October 23, 2018

Cooking Slab Bacon

While doing some routine shopping at Sam's Club the other day, I noticed that they now sell "UN-sliced Bacon!"  I stopped and for a moment, I thought the rapture may have just snapped me up and I was blissfully shopping in Heaven's Sam's Club, with Gabriel, Saint Peter, and somewhere in the offices above, Jesus was now in charge of the meat!


What's better than bacon?  Slabs of bacon.  Deliciously thick, honking, juicy, cubes and slabs of bacon.  Let's do it.

You Will Need:

  • 1 2lb block of cured and smoked un-sliced bacon
  • Heavy pinches of:
    • Chili Powder
    • Black Pepper
    • Brown Sugar
Preheat your oven to 375 degrees F, and get out a heavy-bottom frying pan (cast iron is great for this).  "An oven and a pan," you say?  Yes, we're going to render a good bit of the fat out, then crisp up the edges!  Just... "Trust me!"  Start with your slab of bacon and cut them into cubes, roughly 1" wide.  This 2lb slab yielded 24 cubes so, you do the math when you break out your knife!

Now, take a regular cookie-sheet and spray it with non-stick cooking spray, add a layer of foil, then place a nice cooking rack on top of the foil.  If you don't have a cooking rack for your cookie-sheets yet, NOW is the perfect time to buy one!  Spray it with non-stick cooking spray too, or you'll spend the rest of the afternoon cleaning it... Arrange your bacon cubes on the rack as shown here.  Give them some space to breath and to embrace the heat!

Cook them for 45 minutes at 375F.  Notice that they're a lot smaller!  Some of them will topple over as they lose their fat.  Aren't they precious?  Also notice that you have a lot of bacon fat in the bottom of the pan... SAVE it!  This is "butter" for so many other dishes.  From soup, to cornbread, frying eggs, and a zillion other things, bacon fat is a miracle of nature.  God bless pigs!
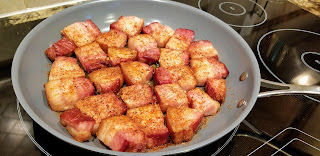
Now, arrange your cubes in a pan.  Sprinkle your spices over the top and set the heat to Medium.  Let them sizzle over Medium heat for 20-25 minutes.  -OR-  Sliding the pan into a pre-heated smoker (200-225F) wouldn't be the worst idea either... You're looking for a nice crispy crust to form, that's not too brown.

When they're ready, carefully flip each one over and reduce the heat to Medium Low.  Let the other side crisp up for another 20 minutes or so.

"But Ken," you say, "That's almost an hour and a half to cook bacon!  Are you sure?"  Yes.  I'm sure.  These beauties are triple thick and you want to make sure the insides have had a chance to render their fat and to get all nice and juicy and piping hot.  You're working nice and slow here over fairly low heat.  You'll be just fine!

When time is mercifully up, slide your baby-slabs into a serving bowl and cover them with foil for a few minutes so they can rest and cool just a touch.  Then, bring this bowl to a pot-luck dinner or set it in front of your guests while you finish their main dish.  Bask, and dance a small jig as they praise you in songs of jubilee!  There will be much rejoicing... When Aunt Ruth brings her green jello casserole to Thanksgiving Supper this year, knock her skinny ass into the dirt with a huge bowl of bacon slabs.  You'll hear applause...

Monday, August 6, 2018

Chili con Queso Stuffed Monkey Bread

What if you made a big pile of "Monkey Bread" with yeast rolls?
And what if you stuffed each roll in the pile with Chorizo and Chili con Queso?!
And what if you served this ridiculous creation with an extra bowl of Queso for dipping!?!?!
That would just be downright "wrong," dirty, naughty, bad for you, fattening, and a wicked slap in the face to every diet on the planet, right???

Right!


So, let's get started!

You Will Need:
  • olive oil
  • 1.5 lbs fresh Jalapeno Sausage or Chorizo
  • 1 yellow onion (diced)
  • 2 red bell peppers (finely minced)
  • 1 jalapeno pepper (finely minced, membrane and seeds included)
  • 2 cups heavy whipping cream
  • 1 1/2 pounds Yellow American cheese.  That's 24 slices, everyone knows this... :-)
  • 1/2 pound Pepper Jack cheese (shredded)
  • 1/2 stick unsalted butter (cut into 1/4-inch cubes, divided, plus extra for greasing)
  • 1 (24-count) package frozen yeast rolls (thawed)
Ok, I need to give credit where it's due.  I saw this recipe on TV on a show called "The Chew."  Michael Symon was eating an obscenely cheesy roll and I stopped in my tracks to see, "What's THAT?"  So I tried it.  Here are my results.

First things first, you gotta make the queso!  Why first?  Because it needs to spend the night in the fridge to get stiff enough for you to stuff into the rolls.  So... cook the sausage in a pan and use whatever you have to chop it into a fine crumbly mixture.  I have this nifty ground meat chopper, but you can use whatever you got.  Drain the sausage and pour it into a bowl and set it aside.
Next, prep your veggies.  You basically need a super fine dice of your chilis, onions, etc.  Dump them all into your big spaghetti pot and saute them in some olive oil until they're soft.
Why use your big pot?  Well, once you start adding cheese and stirring it, things get pretty not.  Napalm hot.  You don't want a super hot hunk of half-melted cheese flying out of the pan and onto your arm.  So... give yourself some vertical room.
When the veggies are soft, add the cream.  Things will happen pretty fast from this point forward.  You don't want your cream to scald, so turn the heat down to medium, and get ready to add the cheese.
It helps a LOT if you have your cheese ready ahead of time!  Grab one or two slices at a time, and stir them in until they're melted into the mix.  It won't take long; before you know it, you'll be out of cheese and ready for the next step.
Stir and stir until, well, you know, it's "Queso!"  You may need to test it 5 or 6 times to be sure it's right.  Use chips, it's too hot for fingers!
Pour the cheese into two separate containers.  Why?  Because you'll use one to stuff the rolls with, and the other to serve as a dip with this magnificent creation!
Add your sausage to one of the cheese bowls and stir it in.  Then refrigerate them both for at least 3 or 4 hours.  Overnight is best.
Set your frozen rolls out an hour or so before you're ready to bake, and set your oven to 350 degrees.  Grease a Bundt pan with some butter and get started with the stuffing!  Stretch out a ball of dough and dump in a heavy tablespoon of the sausage-cheese mixture.
Pinch the edges together and BE SERIOUS ABOUT IT!  This little ball will want for all the world to come apart so; pinch hard and well, and often, until you have a nice round ball like this one.  Repeat, 24 times...
Toss your stuffed dough-balls into the Bundt pan and sprinkle your butter cubes on top.  Aren't they the cutest!?  Slide them into the oven for about 45 minutes.
When your house smells like Heaven and the rolls expand, eclipse the top of your pan, and turn golden brown, it's time to pull them out of the oven!
Let the pan sit, un-molested, for ten minutes.  Then, place a platter on top of the pan and quickly flip it over.  BE CAREFUL!  Things are hot, butter is slippery, etc.  You can do this, Wear a trusted pair of oven mitts, grip the edges of the pan and the platter firmly, and FLIP!  Slide the pan away and... VIOLA!  Cheese stuffed Monkey Bread! 

Re-heat the remaining cheese, and pour it into a bowl and set the bowl into the middle of the "tower."  The original recipe actually calls for the extra Queso to be poured directly into the hole!

While I am certainly capable of eating this entire thing, I didn't.  I actually set it out for guests and I walked away!  I was told that the last piece was still warm when it was eaten so, don't figure on this lasting too long...

Thursday, July 19, 2018

Sweet and Spicy Bacon Wrapped Chicken

So, I was staring into my refrigerator the other day, hungry as usual.  My stomach and my brain had this interesting conversation (as they often do;  I should charge admission, those conversations get pretty weird).  Here are some snippets that I managed to remember:  "Chicken!  Is that thawed?  Wait... Spicy chicken, that sounds good.. What's this leftover bacon doing in here?  OOOH, Sriracha!  I should probably use these green beans before they get soft, and that spinach has been in there awhile..."  Viola:


While this dish was inspired from a random refrigerator "pull," there's no reason you couldn't cook it yourself!  Delicious, super simple, let's go!

You Will Need:
  • 2 Large Skinless Boneless Chicken Breasts
  • 1 lb Thinly Sliced Bacon
  • 1 Cup Brown Sugar
  • 1 Tsp Salt
  • 1 Tsp Pepper
  • 1 Generous handful of fresh green beans
  • 2 Generous handfuls of fresh spinach
  • 1 Healthy Squirt of Sriracha hot sauce
Preheat your oven, BBQ, Grill, or Smoker to 375 degrees!

Start with a 13x9" casserole dish.  Wash and trim your green beans to your liking (I like them long) and dump them into the casserole.
Wash your spinach and dry it as best as you can.  Pile it up on top of the green beans.  Don't worry if the pile looks huge, it should!  Spinach is very sneaky and will shrink to almost nothing when it cooks.  So, fear not!  Build yourself a big mountain of spinach greens!

To get the chicken ready, dump the brown sugar, salt, pepper, and Sriracha in a bowl.  Use your fingers, use a fork, whatever... just mix until it's all a nice smooth crumbly mixture.
Now, let's turn our attention to the chicken.  Wash your hands, grab your knife in your dominant hand, and spin the breast around with your other hand as shown.  Cut it, with the grain, into 3 or 4 equal strips.

These were large breasts, so I got four strips out of them.  Yes, I used the words, strip, large, and breasts in one sentence!  Let's all have a chuckle... now, grow up and let's get back to the kitchen!
Take each chicken tender and coat it with the sugar mix.  You can try to use a fork, like I did here, but you'll eventually get frustrated and abandon it so... just accept that you're gonna get sticky and roll and press each breast in the spicy sugar, then wrap it in a strand of thin bacon.

The world loves thick bacon, so; why thin bacon? Well, thin bacon stretches and wraps so much better than thick bacon.  It also crisps up more quickly and requires less cooking time.  The chicken will be done in a relatively short amount of time, and we don't want the chicken in the oven for even a minute longer than necessary so... Thin bacon is the ticket.

Pile all of your wrapped tenders on top of your spinach, pressing down when you have to.  Sprinkle the tops with your favorite BBQ seasoning if you like.  Insert a remote temperature probe into your largest tender, and slide them into the oven.
When your chicken touches 165F, pull the dish out and have a look.  The kitchen should smell interesting... a delicious mix of sweet, spice, bacon, veggies, YUM! 
You can cut into a "test" tender if you want, the juices should run clear, and since we cut them WITH the grain to start with, each tender bite should now go against the grain for a super easy "chew" and easy cutting!
Serve the chicken over a mound of your veggies and dinner is DONE!

Monday, May 7, 2018

Smoked Pork Belly Chicharróns (Pork Rinds)

When most "normal" people hear the words, "Pork Rind," they make a funny face.  Well it's more of a "squeamish" face, actually.  I can't blame them.  When I think "Pork Rinds," I think of convenience stores and bags of puffy plastic looking fried pork skin that is so over-seasoned that "normal" people couldn't even eat them.  BUT, What if you took whole slabs of bacon, with all of that delicious meat and fat, and you left the skin on, and cut it into bite-sized chunks and THEN you gently deep-fried it?  You've an AMAZING snack called a "Chicharrón!"


You Will Need:

Luckily, more and more stores are selling whole pork bellies these days.  You'll need a whole skin-on pork belly, smoked to perfection and an internal temperature of 190 degrees.  You can use my recipe, here, if you choose, or use any one that you like.  Just place the whole cooked belly into the refrigerator overnight before you proceed.
Place the belly on your cutting board and slice it into planks, just exactly as though you were slicing bacon.  Cut them 1/2" thick.
Then, slice 1/2" cuts from your 1/2" slabs until you have hundreds of gorgeous little bite-sized chunks of the best snacks you'll ever make!
Place them, a handful at a time, into your fry-basket.  Gently drop them into the hot fat and keep your hands, arms, elbows, and anything combustible away from the fray!
When cold pork fat hits hot oil, lots of really cool things happen.  It melts down, and crisps up.  The skin bubbles and gets super crispy.  The meat firms up and develops a nice firm "chew."  So, once they cool down and you can pop them into your mouth, you get a flavorful and amazing crispy chewy snack that melts in your mouth!
Is this a ton of work to go through in order to have a giant basket of amazing pork snacks?  Yes.  Is it worth it?  Yes!  My friend Toney stood tall at the fryer and cooked all of these.  We put them on the table for our Cinco de Mayo party and the next morning, when we were going through the party leftovers, we learned that these had completely disappeared!  We had leftover fajita meat, guacamole, salsa, tortillas, etc, but the Chicharróns completely disappeared.
This made me sad, because I wanted to snack on them for awhile...

Monday, April 30, 2018

Bourbon Peppercorn Cream Sauce

One way to turn a good steak into a great steak is with an awesome sauce!  Bearnaise and Hollandaise sauces grace many a table at fine steak houses to complement Filet Mignon and Ribeye, Prime Rib is always a little better with an excellent horseradish sauce, and for my money, a hearty New York Strip is heavenly amazing with a fine Cabernet Sauvignon and a velvety Peppercorn Cream sauce!  Let's get started...


You Will Need:
  • 1/4 Stick butter
  • 1/4 Cup finely diced shallots
  • 8oz Good Bourbon
  • 3 Cups low sodium chicken stock
  • 4 Sprigs FRESH thyme
  • 2 Cups heavy cream
  • 2 tsp. freshly cracked black peppercorns
  • 2 tsp. whole peppercorns
  • 1/2 oz. Grated Parmigiano-Reggiano cheese
  • 2 tsp. Dijon mustard
  • 2 tsp. fresh lemon juice
  • 2 tsp. Worcestershire sauce
Ok, melt your butter in a large non-stick sauce pan and sweat your Shallots.  Remember, when sweating, you want to see little bubbles but you don't want to hear a loud "sizzle!"  Sweat the Shallots for 5 minutes.
Take your 8oz of Bourbon and pour half of it into a good glass with a few ice cubes.  This is for you to sip on while you stand there stirring the sauce.  Turn up the heat to Medium High, and take the remaining 4oz of Bourbon, and pour it over your Shallots, stirring until the mixture reduces by about 1/2.  This should take about 3 mins.  Shallots, Garlic, and Onions are all packed with alcohol soluble flavors, so do not skip this step unless you have a deadly allergy to booze!

Now pour in the Chicken Stock and add the Thyme.  Stir until it has a nice boil, and then leave it alone, glancing over at it every now and again to make sure it's not boiling over, and let it reduce by half.  This should take 20-30 minutes! 
While the sauce reduces, turn your attention to your peppercorns.  Take 2tsp of peppercorns and place them into a plastic sandwich bag.  Give the bag a few sturdy WHACKS with a mallet to crack them up.  You don't want pulverized pepper powder here, you're going for a "rough chop" of sorts.
Once your sauce has reduced, use some tongs to remove the Thyme sprigs, and add the cream and the crushed peppercorns.  Reduce the heat until you get what I like to call a "firm simmer" (obvious bubbling, but not a rolling boil, see photo on left).  Let it simmer, stirring often, until the mixture reduces to about 2 cups and is slightly thicker than cream.
While you're waiting/stirring the sauce as it thickens, have another sip of your Bourbon and prepare the final mix for the sauce.  Whisk together the mustard, Worcestershire, lemon juice and the remaining 2tsp of whole peppercorns.  Set it aside and grate your cheese. 
Here's what 1/2oz of ungrated Parm looks like.  Grate it into a little pile and sprinkle the pile over the sauce as it thickens.  Stir it in, and continue to reduce the sauce.
Near the very end, when the sauce is juuuust about as thick as you want it, add the whisked ingredients and stir them in.  The sauce should certainly coat and stick to the back of a spoon!
If you make this sauce ahead of time (I highly encourage it because when you're grilling steaks, your focus should be on the steak and not the sauce), you can store it for hours in a clean stainless steel thermos.  Don't use a cheap plastic one because plastic holds onto flavors like "coffee" and you don't want that in your sauce!  Ignore the empty Bourbon decanter in this picture... that was a personal tragedy that required an entirely different effort to solve.  Just remember to pour the sauce into a gravy boat or something before you serve it.  Pouring sauce out of a thermos bottle at a well set table is not exactly, "Fancy!"