Tuesday, December 1, 2015

Smoked Turkey Breast (for all the right reasons)

Turkey meat that is super-juicy, tender, well seasoned, and perfectly prepared is a treat.  So, why is it so hard to get it exactly right, every single time?  Well, turkeys present a bit of a conundrum...


Here's the problem... White meat is done at 160 degrees F.  Dark meat isn't safely cooked until it hits 180 degrees.  Why would anyone overcook (and dry out) the white-meat by 20 degrees, just to get the legs and thighs up to the proper temperature?  I say... "Don't!"

You Will Need:
  • 2 tablespoons Worcestershire sauce
  • 1/4 Cup apple cider
  • 3/4 Cup honey
  • 1 (12-ounce) bottle beer
  • 1 TBSP salt
  • 1/2 Cup Tony Chachere's Creole Spice
  • 1/2 Cup olive oil
  • 3 Fresh (or thawed) Turkey Breasts


A quick word about the Turkey Breasts... do NOT get the "Turkey Roast" or "Turkey Loaf" pack from the store.  You want the twin breasts, with bones, just as they came from the Turkey. The label should say something like "Turkey Breast with some back and wing meat."  I find that three of these will fit very nicely into one of those full sized foil pans you can get for $1.
When you get your breasts home, thaw them out.  Once they are thawed, open them up and drain them, then rinse them well and pat them dry.  Notice that they haven't been split open... this makes them wobbly and they have a hard time standing up on their own.  Splitting them open increases the surface area for cooking, and helps them be more stable in the pan.
Rotate the breast so that the narrow end is pointing up (shown here, at the right).  With a good pair of poultry or kitchen-sheers, snip out the remnant of the backbone that's left. Grab the two vertical plates from the ribs (one in each hand) and lay the breast down, pressing on both sides.  You'll hear a "POP" as the wishbone breaks and the breasts split open and away from the keel bone.  
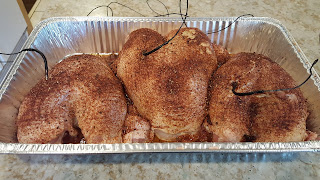
Once it's been split, you can lay it down (skin side up).  Repeat the process for all of the breasts and get them situated in the pan.  Snug them up next to each other so they can commiserate in their misfortune!  Wash your hands and grab a couple of beers, one for you and one for the injection...

Mix all of the ingredients for the injection together in a bowl.  I use a whisk and I mix very thoroughly!  Don't expect the seasonings to dissolve and don't expect the mixture to come together into a nice homogeneous liquid.  It won't!  You'll need to whisk and mix every time you fill the injection syringe!


Fill the syringe (available at most any grocery store, Amazon, etc) and start shooting up your breasts!  This is "Breast Augmentation" of the finest order!  If you over-inject and some leaks out into the bottom of the pan, worry not, you'll be pouring the rest of the injection into the bottom of the pan!  I give a total of 4 injections (2 on the left, and 2 on the right) to each breast.

Now, once your breasts have been injected, pour the rest of the liquid over the breasts and into the pan.  Insert a probe thermometer into each breast (if you have that many probes, do it!), or into the largest breast if you only have one probe.  Place the pan into your oven or smoker, and bring the heat to 250 degrees.  The trick is to slow-cook these wonders up to 160 degrees, AND NOT A SINGLE DEGREE MORE!!

When they hit 160, pull them out and cover everything with foil.  Let them sit there, nice and quiet (away from the reach of your hound-dog, if you have one like mine).  They'll probably carry-over to 163 or so, no big deal.  After 30 minutes, you should be able to carve them up.  Cut them right down the middle, then cut each breast laterally, so that a juicy piece of the skin goes with each bite, as shown (below).  You will LOVE this turkey!  I've been told by several families that I've cooked this for, that "It was the best turkey they had ever eaten!"


Monday, September 14, 2015

"Hot Smoked" Salmon, Whole Filet!

When most people hear the words, "Smoked Salmon," they imagine a slab of cold salty fish, smashed onto a bagel with some cream cheese.  "Cold Smoking" is a food preparation process that usually involved brining (salting) and drying the meat out with an infusion of cold smoke, to preserve it for long periods of time.  This is awesome if you're an Eskimo, or if you live without the modern convenience of electricity and refrigeration.

I am not an Eskimo.I prefer to actually cook the salmon with hot smoke in a cooker that uses charcoal and wood.  The results are super-duper tasty, look!


Why doesn't everyone smoke their Salmon the same way they smoke pork, brisket, ribs, or chicken?  Because it's FRAGILE and super easy to screw up, that's why!  Using a few simple tricks, you can make this restaurant quality dish at home and impress even the snootiest of your friends!

You Will Need:
  • One Full-Sized Raw Salmon Filet
  • One Foil Pan, large enough to accommodate your fish
  • 2 Tbsp Fresh Lime Juice
  • 2 Tbsp Extra-virgin Olive Oil
  • Fish Rub - 1 Tbsp Each of:
    • Coarse Sea Salt
    • Smoked Paprika
    • Coarsely Cracked Peppercorns
    • Dark Brown Sugar
    • Chili Powder
    • Old Bay Seasoning

Ok, mix your lime and oil together and use your fingers to spread a small portion of it all over the bottom of your foil pan.  We don't want your salmon to stick to the grates of your grill so we're going to cook it in a pan.  We don't want your salmon to stick to the pan, so we're going to coat it with oil (and lime juice, to flavor the bottom of the filet).

Lay your fish into the pan (flat side down) and make sure it slides around when you jiggle the pan.  Pour the rest of the oil/lime over your fish and massage it into the filet.  Then liberally sprinkle the rub across the top.  Make sure you get an even coat of the rub over all of the fish.  Go ahead and get your fire going outside in your cooker, and aim for a temperature of 225 degrees F.


Pulling this fish off of your cooker when it hits the correct temperature is everything in this dish!  Seriously, it's as easy to under-cook this fish as it is to burn it so, you'll want to watch it carefully!  I inserted my thinnest temperature probe into the thickest part of the filet.  Push it in slowly, and watch the readout.  If you pulled this fish out of the fridge to prep it, you should stop inserting your probe when it reads 38-42 degrees.  Then you'll know you hit the cold spot.


When is it done?  Great question... Salmon is "done" at 140.  It's also done at 160!  Any degrees of doneness between these two temperature extremes is perfectly presentable and up to your own personal preference.  Me?  I'm a sushi lover so I'll aim for 140.  Some people like it a bit more firm so they shoot for 150.  Things start to dry out at 160 though, so be careful.

How long will it take?  Another great question.  Have a close look at my thermal readout during this cook.  The fish started at 46 degrees.  It climbed up to 91 in 30 minutes, in a cook chamber that was 227 degrees.  In the world of "Low and Slow Cooking BBQ," that's NOT a long time!  23 minutes later, it was done!  So, keep a sharp eye on it.  There are lots of factors at play here... humidity, size of the fish, quality of heat circulation, etc.  Do not just set a 45 minute timer and walk away.  Have an adult beverage, close the lid, and watch your thermometer!

When my digital thermo-probe said, "140," I double-checked it with my Thermapen.  It read "137.8."  No problem.  Cover the pan with foil, and place it in a 150 degree oven to keep it warm and to bring it up another few degrees.  Thirty minutes later, it was a perfect 141.2 degrees and ready for slicing and serving!

Have a look at the meat.  At 140, there is still a ton of moisture here, and the fish flaked perfectly.  It was nice and soft but not mushy.  I totally understand it this looks a bit "underdone" to you, if so, shoot for 150 degrees.  My guests were thrilled, and the leftover salmon still had plenty of moisture and turned my last heart of Romaine into an amazing Salmon Caesar Salad....

Tuesday, August 11, 2015

Smoked Pork Belly! Bacon or NOT Bacon?

God, in his infinite wisdom, gave us the pig.  Pigs are packed with a variety of amazing, tender, delicious bits, and their rotund little bellies are the best, hands down.  There is no more flavorful, juicy, or soft and tender portion of meat than pork belly.


Humans have savored pork belly for years.  Prior to refrigeration, we knocked ourselves out trying to preserve such a valuable morsel.  We finally settled on a process of salt curing and cold smoking the belly and "bacon" was born.  I submit to you that today, 100 years later, we have refrigerators and freezers and while bacon has its place in the world, there are other ways to prepare pork belly!  Some of them might even be MORE delicious than bacon!  There, I said it....

You will need:
  • 1 Whole, 10lb untrimmed/unsliced pork belly (with or without the skin)
    Chunks of Apple Wood / Charcoal
  • Pork Rub
  • Yellow Mustard
The first thing you have to do is to find yourself a pork belly.  This is easier said than done, due to our insatiable demand for bacon, but it's possible.  Recently, Costco offered raw pork bellies to the masses at $2.29/lb!  I've seen it at restaurant supply stores like Restaurant Depot, and you can always find it on the internet.  The instructions say to cook to an internal temperature of 145 degrees, followed by a 3 minute rest.  No... we're so NOT doing that!  Don't worry, everything will be fine!  Just make sure you don't buy a pork belly that has already been cured/smoked, or you'll be bringing home a huge slab of bacon.

Open it up, drain it, rinse it in cold water, and pat it dry with a paper towel.  Trim any excess or obvious lumps or "tailings" of fat away so you have a nice squared chunk of belly.

Now, flip it over so the fat side is up.  Do you still have the skin on your belly?  It will be easy to tell, you'll see a few pig nipples and hair follicles here and there, and you'll feel the toughness of the skin.  If yours does still have the skin on, great!  Leave it in place.  If not, no big deal; we will make it work either way (more on this when it's time to hit the heat).  Skin or no-skin, you'll need to score the fat side with a good sharp knife.  I like this nifty diamond pattern, but you can score it however you like.  Extra points for creativity here, as long as you keep the lines nice and straight!  Just make sure to cut through the skin, and through the fat to the top layer of muscle.  Don't cut through the muscle!  Just the fat...

Have I mentioned how delicious this is going to be?  Imagine a hunk of pork that is as rich as a cheesecake, but softer, in texture.  Yes, it's going to happen... 

Now, rub the fat side with yellow mustard.  Make sure you get full penetration down into the cracks of your score marks!  Rub, rub, rub, keep everything nice and uniform and pretty.  You're about to apply the rub and you want a nice uniform layer of that as well.  No extra thick pockets of mustard or spices to bite into.  Take your time, it will all be worth it in the end!

Apply the rub.  I like an even mix of Smoked Paprika, Brown Sugar, Honey Powder, Salt, Cracked Pepper, and Chipotle Chili powder, myself.  Your mileage may vary.  Just be sure to use a rub that you've had before and that you like!  This poor pig spent a lifetime growing this belly, there's no sense in ruining it with a rub that is too bitter or spicy! 

Note, I did not apply the rub to the other side of the belly.  It's thin and I felt that a single layer of rub was plenty.  I'm glad I did it this way, because the spice was perfect, you do want the flavor of the pig (not the rub) to shine here.  Now, whether you're skin on or skin off, it's time to move to the smoker! 

Pour yourself a nice cold beverage.  Take a long chug, wipe your mouth, and put on some latex BBQ gloves.  Once you have your smoker up to 225 degrees, lay down a layer of non-stick foil that's just as big as your belly, and then lay your belly on top of the foil.  Insert a temperature probe into the meaty center of the porcine goodness and take one last look at your belly(ies) to make sure they look happy.  Close the lid to your smoker and walk away until the internal temperature hits 160 degrees.

At 160 degrees, it's time to check on your little piggy.  Caution, you'll be tempted to just eat it right then! Don't do it... discipline!  Technically, the meat is done and it's certainly safe to eat at this point, but there is more fat to render and more connective tissue to break down so; we're going to cover the whole belly with foil and continue to cook until the internal temperature hits 195 degrees!  So, don your gloves again, put down your beverage, and get your belly(ies) covered!
When they touch 195, pull them off the heat and lay them down in a cooler.  Close the lid and walk away for one hour!  I know, it's hard... but consider they just spent 4-6 hours in your smoker; what's another 60 minutes?  Let the juices re-orient themselves and let things settle down.  Do NOT skip this step!
When you're time is up, you'll be ready to serve.  How do you serve pork belly?  You have options!  You can slice it into "Squares of Wonder!"
You can slice it into thick ribbons of decadent goodness!


You can pull it into ribbons of soft "pork-sicles," softer than your mouth has ever known!

Friday, July 24, 2015

Smoked Prime-Rib Roast! (Wooo, Prime-Rib, YAY for Prime Rib!)

What is "Prime-Rib" anyway?  Well, first consider the awesome Ribeye steak.  Where did it come from?  If you follow a cow's ribs from the belly all the way up to the spine, you'll find a roast up there, clinging to that line of rib bones.  If you were to take that roast off of the bones and slice it laterally, you'd be cutting Ribeye steaks.  If you kept that roast whole, you'd have a "Rib-Roast."  If that Rib-Roast were graded as "Prime" by the USDA, you'd have a "Prime Rib Roast."  Cook that, slice it, and you'll be serving Prime Rib!

 
A whole Rib-Roast is an expensive piece of meat.  You can save a bit of $$ if you buy a "Choice" one (rather than Prime), and you'll save even more if you buy it from a warehouse store like Costco.  Either way, it's worth the cash, as long as you don't screw it up.  How do you do it right?

You Will Need:
  • 1 whole Rib-Roast (I bought a whole 7-bone roast, but you can ask the butcher to cut a 3 or 4-bone chunk if you don't need that much meat.
  • Olive Oil
  • All-Purpose BBQ Rub, or Montreal Steak Seasoning
  • Temperature Probe (REQUIRED)
For the Horseradish Cream & Mushroom Sauce (pictured above)
  • 1 Medium sized Vidallia Onion
  • 1.5lbs of sliced fresh mushrooms
  • 3 Cloves Garlic (crushed and diced)
  • Olive Oil
  • 3 Tbsp Cornstarch
  • 2 Cups Beef Broth
  • 6 Tbsp Prepared Horseradish (not the sauce, the pure horseradish)
  • 3/4 Cup Sour Cream
  • Fresh Ground Pepper
Let's begin.  Take it out of the cryo-vac pack and pat it dry with some paper towels.  Just look at it!  It's HUGE!"  I know... settle down.  If you look carefully at this picture, near the bottom-left part of the Ribeye that's staring you in the face, you'll see a golf-ball sized portion of meat, surrounded by a ring of fat.  See it?  That line of fat is where you need to insert your knife to cut down the length of the bones (unless you bought a boneless rib roast, then you can proceed past this part).

Flip the roast over, and start your cut at one end. If you follow the line of fat correctly, this should be a very easy cut to make.  Then, cut from the tips of the bones back toward the roast, so that a neat rectangle of meat and fat pulls away from the tips of the bones.  Save this!  Cut it into smaller squares and use it later to supplement your beef stew, chili, or whatever.

Now, notice that the bones are connected to each other with little squares of meat.  Cut these out as well.  This technique is called "Frenching" and it can take some time, depending on how cleanly you want to present your bones at the table.  I like to use dental floss (yes, floss) to literally floss them them clean.  Just wrap the floss around the base of the bone, grab the ends and PULL!

Once you've frenched the bones, take some cotton butcher's twine and tie some tight loops between the bones.  The roast will swell up a bit during the cooking and you'll want her to stay together, all nice and tight!  To prep the roast for the smoker, simply rub it down with Olive Oil, and shake on a good salt-based rub.  Montreal Steak Seasoning works very well, but I made my own rub with some Kosher Salt, Chipotle Chili Powder, Cracked Black Pepper, and a touch of Brown Sugar.  Use whatever you like but don't be shy!  This is a huge honking chunk of beef and it needs salt and spices!

Insert a digital probe thermometer so that the tip is in the center of the meat.  I prefer the method shown here, to the method of jamming the probe into the end of the roast.  Why?  Because I don't want to see a little hole in my steak later when I slice and serve!  Do you need a digital probe thermometer?  YES!  You just spent about $175 on a piece of meat.  Why risk ruining it over a $20 oven-safe digital thermometer?  Crazy.  Go get one!  Do NOT listen to your ego say, "You're a man, you will know when it's done when it's done" or whatever.  It's about the perfect piece of Prime Rib, not about your Neanderthal heritage.

Leave this roast on your counter-top until it comes up to room temperature.  Otherwise, you'll burn the outside before the inside is done properly.  When the inside of this roast hits 60 or higher, it's safe to start cooking.

I got my smoker running right at 250 degrees when I put this roast on.  I set the temperature alarm for 125.  The alarm went off exactly 3 hours and 37 minutes later.  Will that amount of time work for your roast?  Maybe... The only way to know for SURE is with your thermometer.  When it touches 125, pull it out of the smoker and wrap it in 2 or 3 layers of tinfoil and then place it in the bottom of a good cooler.  Close the lid.  Let it rest in there for at least 45 minutes.  The temperature will clime another 10 degrees, in fact, mine climbed up to 138 before it was finished resting.  138 is the perfect Medium Rare.

After the rest, I sliced her open.  Hallelujah, Saints be praised!  She's a perfect medium rare!  And look, someone left a bottle of Basil Hayden Bourbon on my cutting board!  How'd that get there?

All that's left now is to slice the portions (I like one bone per portion) and serve it with a nice horseradish cream sauce.  Maybe with some mushrooms??

OH... wait; did someone say "Sauce?"  Here's my sauce recipe:

  1. In the biggest saute or frying pan you have, saute the onion (diced) with the garlic until the onions are clear.
  2. While the saute is going, mix the cornstarch with 1.5 cups of cold beef broth.  Why cold?  It's the only way you'll get the corn starch to mix well without clumping.  Use a whisk and beat the crap out of it.
  3. Stir the broth into the saute and add the horseradish.
  4. Add the mushrooms.
  5. Cook and stir over medium-high heat until the mushrooms cook down and the liquid reduces and thickens.
  6. Kill the heat and stir in the sour cream.
  7. Finish with several grinds of fresh pepper.

Monday, July 6, 2015

Sweet & Spicy Smoked Hunks of Bacon!

Bacon, as most of us know, comes from pork bellies.  As you can probably imagine, they process thousands of bellies at the bacon factory.  During this processing, there are many ends, pieces, and stray hunks of bacon that fall by the wayside.  Well, some angel sent from heaven grabbed the floor manager and implored him, "PLEASE, if we collect and save all of these stray hunks of bacon, we could SELL them at a discount!"  Thanks to that wonderful angel, we can now find this at the store:


With a tiny bit of work, you can turn that... into THIS!!  How does a big pan-load of thick hunks of bacon, flavored with maple, brown sugar, agave, and spicy Chipotle goodness sound?
Don't we all want that?

You will need:
  • 3lbs of Bacon ends, pieces, and random hunks
  • 3/4 cup dark brown sugar
  • Generous "burp" of pure Maple Syrup
  • Generous "burp" of Agave Syrup
  • 2 Tsp fresh ground Black Pepper
  • 3 Tsp fresh Chipotle Chili Powder
  • Generous squirt of your favorite BBQ Sauce
Open the package of bacon and dump onto your cutting board and give it a look.  You'll see all kinds of bacony goodness.  Thick strands, lean pieces, Marbled hunks of fat... it's all good!  Use a sharp filet knife to cut everything into oversized bites.  Bacon shrinks a little when you cook it, so be sure to cut things down to a size that might be slightly larger than you'd be comfortable shoving into your mouth (like that's possible).

When everything is cut to fairly uniform hunks, dump them into a foil "half pan" where you'll add the "yum".  Take off your wedding ring and remove any other jewelry from your hands, because things are about to get messy...

Sprinkle on the brown sugar, then add the rest of the ingredients.  If you can't find Agave syrup at the store, don't fret, just use a bit more Maple syrup.  Agave syrup is derived from the same Agave cactus plants that give us Tequila!  "Tequila and bacon," you say?  Hell yes!  Actually, Agave syrup doesn't taste like Tequila at all, it caries a fairly complex yet very sweet flavor though, so it's worth looking for at the store.  Most of the world's Agave plants live in Mexico, hence you'll probably find it in the "Mexican Food" section.

Now, get your hands in there and get messy!  Squeeze, mix, swirl, turn over, spread, and pinch everything together until you feel the brown sugar dissolving, and you have a big pan full of awesome bacony wonder that looks like this:

Wash your bacony hands.  Wash them twice, and be sure to clean under your nails because day-old bacon that you smell under nails in the morning is about as bad as bacon can be... slip the pan onto your smoker, to the right of the pork shoulder that you just wrapped.  If you don't have a pork shoulder, it's ok.  I happened to have one when I took the picture (it was delicious).

Close the lid to your smoker and run the temp at 225 degrees for two more hours.  The whole back yard will smell like BBQ and Bacon, it's pretty remarkable.  Your neighbors will start sniffing around... tell them to "Go away!" (unless they bring beer offerings).  When the bacon is done, it will look like this!  It doesn't get any better than this...


These are amazing on just about any sammich, or just popped into your mouth.  You can also chop them up and sprinkle them into salads, on top of baked potatoes, or over freshly grilled shrimp with garlic butter sauce.

NOTE:  Somebody already asked me, "Can I do these in the oven if I don't have a smoker?"  I suppose.  Just put them into the oven at 375 for about 45 minutes.  They'll still be good, just not as "smokey."  This is exactly the kind of thing you can use to justify the purchase of a smoker in the future though... "But, but, honey-pookums, wouldn't you enjoy some SMOKED bacon, hmm?"

Tuesday, June 30, 2015

The Ultimate BBQ Breakfast Sandwich; and Tips on Sunny-Side Eggs!

It's rare that I ever have leftover pulled pork in the fridge.  Most of the time, I'm delivering pork to a customer or I'm hosting enough people at my own house to devour it all.  So, when I found a zip-top bag full of the porcine goodness one early Saturday morning, I invented this sandwich (or "Sammich" as I like to say):

Imagine the yolk oozing into the pork juices, and the toasted baguette soaking it all in.  Feel the crunch of the edge of the egg white and the crispy edges of the bark from the pulled pork as they mingle together in your mouth... yes, this; THIS was a good sammich!

You will need:

  • A generous plug of pulled pork
  • An egg (sunny-side up)
  • Some good bread (Ciabatta, or French Baguette rolls work well)
This sammich is easy.  Well; I mean, if you've already invested 8-12 hours slow-smoking your pork shoulder, the rest is easy!  Toast the inside of your sammich bread.  My toaster has a "Bagel" setting that I use to toast only what will become the inside surface of the bread.  Butter both sides when they come out of the toaster.  Warm up your pork, and portion a hunk onto the bottom of the sammich.  While the bottom of the sammich starts to absorb the pork fat, turn your attention to the egg.


Runny yolks freak some people out.  This sammich is not for those people!  While the FDA would like nothing better than to snatch this egg right out of your hand for merely THINKING about eating the yolk raw, I plan to take my chances.  If you're super freaked-out, you an always buy pasteurized eggs or you could cook it a little more.  I HIGHLY recommend a runny yolk though, as it's flavor really enhances the pork.  The first step to the perfect sunny-side egg is a good egg pan.

Eggs are sneaky.  if there's a burr or a hot-spot in your pan, the egg will find it, stick to it, and make your life difficult.  This is why I have an "Egg Pan!"  This is a high quality, heavy, anodized aluminum pan with a good non-stick surface and a tight fitting lid.  When you buy this pan, you'll need to declare to your family, your household, your neighborhood, and your entire kingdom that this amazing piece of kitchen hardware is your "Egg Pan!"  It will cook nothing but eggs, omelets, and possibly bacon.  Nothing will touch it but silicon spatulas and wooden spoons!

Heat up your egg pan on high heat, and toss in just a small dab of butter.  When the butter sizzles, slowly and carefully ease your egg(s) into the pan.  Immediately reduce the head to medium.  Be patient, resist the urge to slide the eggs around.  Once the bottoms turn white, add about a teaspoon of water to the pan and put on the lid to trap the steam.  The steam will cook the albumen (the gooey part of the egg right under the yolk).  With some gentle prodding, you can "pop" the eggs loose and slide them around your pan.  I like a crispy edge!

Slide the egg right out of the pan and onto your sammich.  Don't worry if you break the yolk during the process, you'll break it anyway once you take your first bite.  If you've done this correctly, the top bun will soak in some yolk while the bottom bun soaks in some pork fat,  When you bite into the sammich, you'll feel some crunch from the toasted surface, the edge of the egg, and the bark on the pork.  Your tongue will be coated with egg yolk and pork fat while your teeth pull that glorious pork apart and mix it all together!  Mmm MMM, Sho' am good!