Wednesday, November 10, 2021

Cajun Jambalaya

One of the easiest Cajun dishes to make?  Jambalaya.
One of the most delicious Cajun dishes to make?  Jambalaya.

Jambalaya

What are we waiting for?  Let's do this!

You Will Need:

  • 1 Tbsp Cajun Spice (Slap Ya Mama, or Tony Chacheres, etc)
  • 1 Tsp Smoked Paprika
  • 1 Tsp Oregano
  • 1/2 Tsp Basil
  • 1 1/2 Cups Long Grain Rice
  • 3 Cups Chicken Stock
  • 2 Cups Crushed Tomatoes
  • 2lbs Meat (Your choice, Chicken, Andouille Sausage, Shrimp, or a mix)
  • 6 Celery Ribs
  • 1 Red Bell Pepper
  • 1 Green Bell Pepper
  • 1 Medium Yellow Onion
  • 3 Tbsp Olive Oil

Common to many Cajun dishes is "The Trinity."  It's a mix of diced onion, celery, and bell pepper.  Jambalaya is nothing if you don't start with the Trinity!  Dice this all up and dump it into a large pot with the olive oil and saute it over medium high heat until the onions start to clarify and the veggies get soft.

When the Trinity is ready, dump in the meat!  I had 2lbs of smoked chicken left over from the BBQ pit so that's what I used.  Normally, I use a pound of cooked chicken thigh meat and a pound of good quality ham or andouille sausage.  The word "Jambalaya" is a Cajun word that is derived from the French "Jambon" which means "ham" in English so... It follows that you should find a way to add some cut ham or at least some bacon fat to the pot!  I went the healthier route this time though, so don't judge!

Stir the meat with the Trinity until everything is heated through, then add the tomatoes and spices.  Stir and stir until it's all mixed well.

Now, add the rice and give it another good stir.  Dump in the chicken stock and bump the heat to HIGH until you see a steady boil.  Reduce the heat to a simmer and put a lid on it.  Set a timer for 30 minutes and walk away... Lots of things are happening in the pot, the rice is soaking up all sorts of flavor, tomatoes are breaking down, aromas are starting to swirl, good times!

When the timer goes off, just give the dish a final stir.  How easy was that?  You don't have to "Serve over rice" because the rice is already there, ready to rock!  Just dish some into a bowl, get yourself a cold beer or a nice glass of wine and put your feet up!

Friday, July 16, 2021

Amazing Biscuits

Behold, the humble biscuit (this one is covered in honey-butter):


Biscuits are so quintessentially American... They're versatile and universally delicious.  Seriously, who says "No" to a buttery flaky biscuit?  I'm going to let you in on a little secret, ready?  Here it is, "Biscuits are EASY!"  It's TRUE!  Let's make some!

You Will Need:

  • 2 Cups A/P flour (250 grams)
  • 1 Tbsp baking powder
  • 1 Tbsp sugar
  • 1 Tsp salt
  • 1 Stick frozen butter (yes, frozen)!
  • 3/4 Cup WHOLE milk

This recipe could not be easier.  From the time you think to yourself, "I could eat a biscuit" to the moment you're shoving a warm buttered biscuit into the hole in your face, less than 45 minutes will have passed!  You have to follow some rules though...

Preheat the oven to 425 degrees F.
Put a whole stick of butter into the freezer.
Get out a bowl and a fork (or your stand mixer).

Make sure the butter stays in the freezer for at least 25 minutes (overnight is even better).  I'm not kidding, this is the key to the whole thing!  The secret of biscuits is the integration of butter into the flour.  This is why "dough cutters" were invented, and it's why your grandmother swore by them.  We're going to take a shortcut...

Now, measure 250 grams of flour and dump it into the mixing bowl.  I prefer to weigh it because if ten different people were to measure "Two Cups" of flour, they'd get ten different amounts of flour, depending on how forcefully they pressed the Cup into the flour, etc.  So weigh it out!  Dump it into the mixing bowl with the baking powder, sugar, and salt.  Use a fork or the dough-hook on your mixer and spin it around slowly for 3-5 minutes.

Ok, if the butter has been in the freezer for 30 minutes, take it out and quickly grate it with your cheese grater!  The goal here is to cut the butter throughout the flour as quickly as possible, before it starts to melt.  When it warms and melts and mixes with the flour, you'll get gluten.  When it comes to pie crusts, biscuits, and other flaky morsels, gluten is BAD!  So move quickly and with purpose!!  Grate the butter and dump it into the bowl with the flour.  Grating butter is fun!

Fluff and stir the butter and flour together with a fork, or spin the mixer's dough-hook on low for a few minutes.  Use a rubber spatula to keep anything from trying to climb out!  Push the flour back down and into the middle as the hook spins around.  In a few minutes, the flour will look like a pile of fine crumbs!  This is perfect!  Don't spin to long, or the butter will warm up too much... Just combine it well.

Pour in the COLD whole milk.  Do not be tempted by the hoard of hippies who want you to use Skim Milk or even worse, Almond Milk!!  Use "whole" milk because you want the FAT!  Despite what thousands of California hippies would try to tell you, whole milk is not bad for you!  Biscuits need the fat and you'll appreciate the richness that whole milk brings to the party so spend the extra time at the grocery store looking for the Whole Milk (it has a red cap, and it's probably hidden behind the skim, or on the bottom shelf).  Pour it in and stir with your fork or let the mixer combine it.  When it looks sticky and lumpy, use the rubber spatula to turn it out onto a floured surface.  It will NOT look like smooth bread or pizza dough.  It will look more like Jabba the Hut.

Now, get some flour on your hands and work the dough for a bit.  Pat it down so it's flat, fold it over, pat it down (or roll it down with a rolling pin), spin it a 1/4 turn, and repeat 8-10 times.  This will build layers!  On the final flip/pat/turn, pat it down until its about 1/2" inch thick.  Use a biscuit cutter, or cup (2 3/4" in diameter) to cut the biscuits.  Place them on a nice Silpat or non-stick baking surface.

If you used 250g of flour, and you're using a 2 3/4" cutter, you should get 7 or 8 biscuits, depending on how thick the dough was when you cut it.  Just cut them out, re-work and re-pat the dough into another 1/2" patty, cut another biscuit, and repeat until you've used all the dough.

Bake them at 425 for about 12-15 minutes, or until they start to brown on top.  If you've done your job right, they'll nearly triple in height!  Let them stand there for a minute or two.  Brush the tops with some melted butter and serve!!

My last batch produced "The Perfect Biscuit!"  Note, the height, the girth, the symmetry... I built a bacon, egg, and cheese sandwich out of it.

Tuesday, April 13, 2021

Smoked Rack of Lamb

I'm just going to tell you right away that this is not your grandmother's traditional Passover lamb.  I'm not a real fan of most traditional herbs, especially when it comes to fennel and rosemary, so... I thought I'd work up a nice chimichurri sauce and lay this rack out on the BBQ pit!!


I must say, the results were unbelievable.  I will no-longer wait for lamb to go on sale, post-Easter!

What You Will Need:

  • 1 Bulb of Garlic
  • 1 "Bunch" Cilantro or Italian Parsley
  • 1 Strong blurb of Olive Oil
  • 1 Tsp Smoked Paprika
  • 1 Tsp Chili Powder
  • 1 Tsp Salt
  • 1 full rack of Lamb (2 blades of 8 bones each)

Begin with the chimichurri.  Peal all of the garlic cloves from the bulb, and smash each of them under your knife.  Add a healthy pinch of salt to the garlic pile, and dice, smear, and mash the garlic into a chunky paste.  Chop the greens and put them both into a bowl.

Drizzle the olive oil over the garlic and herb, and stir in the spices.  It should be as thick as mud, and you should be able to spread it like butter.

Now, turn your attention to the lamb.  There's a fat-cap on them.  Some will tell you that "Fat means Flavor" and that you should leave them on.  While I usually agree with that, in this case I don't.  There's a LOT of fat here, and not much meat.  I'd rather marinate the meat and enjoy it.  The alternative (marinating the fat and trying to chew through THAT) isn't as attractive.

SO, put on a glove and clean this thing up!  Literally, grab a corner of the fat cap and peel it off.  This is super easy to do, just be prepared to assist the removal with a sharp filet knife.

Once the cap is gone, have a look at the silver-skin.  Slide the tip of your filet knife under it.  Now, pull the skin with one hand, while you shave it off of the meat with the other.  You may need to shave several pieces of it to get it all.

Here's a pic of the two halves of the rack, one with the fat cap, and the other fully prepped and ready for the marinade.  Think less of the cute little lambie frolicking around the barnyard, and more about the tasty meal you're about to present!  It helps if you take the time to pour and enjoy an adult beverage during the prep.  I suggest a Pino Noir, or some good Bourbon!

When the rack is prepped, spread the chimichurri sauce all over it.  Use gloves, or your hands will smell like garlic for the rest of the day.  They may even smell like garlic into the night, where they'll wake you up when you roll over and mash your nose into your fingers.

Ok you know how they say, when it's time to marinate something, that "At least an hour, but overnight is best?"  In this case, I would strongly recommend that you marinade this for at LEAST 8 hours if you can't do it overnight.  Why?  Well, the salt and the garlic oils are definitely going to penetrate this piece of meat, but they're not going to do it quickly.  Trust me on this, put the lamb into a bag, squeeze as much air out as possible, park it in the fridge, and walk away!  It will still be there later...

Prep?  CHECK
Marinate?  CHECK
The rest is EASY!  Gently slide a temperature probe into the thickest part of the loin, and stand the rack up in a smoker, or anywhere away from the direct heat.  Bring your pit or your oven up to about 275, close the lid, and leave them alone until they touch 128 degrees.  Yes, 128.  Then pull them off, and cover them with foil, and watch the temperature continue to climb up to 135 or so.

When the temp stabilizes, it's time for the slicin!  Carefully slice the portions between the bones.  Personally, I like to serve them atop a small mountain of garlic mashed potatoes, seasoned with the juice from the rack!

Monday, March 15, 2021

Shrimp in Garlic Cream Sauce with Angel Hair Pasta

Recently, we were snow-bound in the house during a two-day blizzard here in Colorado.  It was time to get creative with whatever I could find in the freezer and/or pantry.  Luckily, I found some raw shrimp in the freezer!!  I also found a bit of heavy cream in the fridge and some past in the pantry: 


So, how about some pan fried shrimp in a nice garlic cream sauce, over Angel Hair pasta?

You Will Need:

  • Several servings of pasta (I like Angel Hair, but Linguini works, too)
  • Two pounds shrimp, raw
  • 2 Tbsp Olive Oil
  • 2 Tbsp Butter
  • 1 "Bunch" green onions, diced and split into two piles.
  • 1/2 Red Onion
  • 8 Cloves of Garlic, minced
  • 1 Spicy Chili Pepper (Jalapeno or Hatch Chili works well) diced
  • 1 Tbsp flour
  • 1.5 Cups Heavy Whipping Cream
  • Freshly shaved Parmigiano Reggiano

Melt the butter together with the Olive Oil in a large saute pan over medium low heat.  Dump in the garlic, chili pepper, red onion, and one of the two piles of green onion.  Season with salt and pepper and stir.  Let it sweat there in the fat for 30 minutes or so (yes, "minutes!"  if it sizzles, it's too hot and you'll burn the garlic.  Use low heat and just let the garlic sit and maybe bubble a bit for awhile)... long enough to infuse the oil/butter with garlic and onion.  The kitchen should smell AMAZING while this happens.

While you're sweating the aromatics, get the shrimp ready!  Thaw them out, peel them, rinse them well, and season them with whatever you like!  Old Bay is nice, but I prefer creole seasoning.  Be sure they're all evenly seasoned.

When the onions are clear and the oil is infused with your garlic, turn the heat up to Medium High and add the shrimp!  Watch them like a hawk, they'll cook FAST!  Using some tongs, flip them after they've cooked for a minute or two.  

It shouldn't take more than 5 minutes to cook them all the way through. Flip them a few times and look for them to curl up and turn a nice shade of pink.  Don't walk away!  Over-cooked shrimp are "bouncy" and rubbery.  Yuk!

When the shrimp are done, use your tongs to take them out of the pan and place them in a bowl.  Whisk the flour into the pan until it's mixed together into a thick roux.  When it's all bubbly and nutty and "tight," pour in the heavy cream....


...and whisk it quickly!  With the heat still on Medium High, it should not take long at all for the cream to bubble!  Keep whisking until the sauce thickens.

When it's nice and thick, dump the shrimp back in!  Use a rubber spatula to gently fold the shrimp into the cream sauce.  Resist the urge to flip them over themselves by doing that "chef trick" with the pan.  That takes a LOT of practice and you're just not that good!  You don't want hot cream sauce all over your stove-top... 


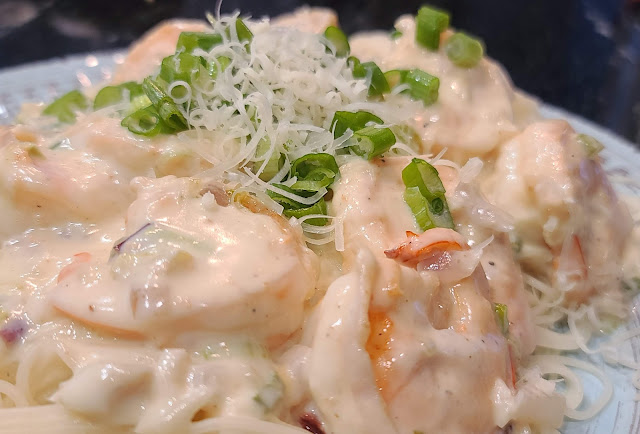
Look at THIS!  Look what you did!  Nice and this creamy sauce that didn't separate, perfectly cooked shrimp with the sauce clinging all over it!  Look at you go!

Now, dish up a plate of your pasta, and ladle some of the shrimpy goodness on top.  Garnish with some of the green onions from the second pile, and sprinkle on some freshly grated Parm.  Yes, I capitalized "Parm."  Why?  Just look at it!!


I LOVE this dish!!  With some shrimp and a few odds and ends from your pantry, you can turn an otherwise mundane evening into a proper DATE NIGHT!  I suggest a nice Sauvignon Blanc with this dish, but my wife prefers a snappy cold beer.  


Wednesday, January 27, 2021

The World's Best French Onion Soup!

French Onion soup is NOT "Just a treat to order in a restaurant!"  It's quite delicious, easier than you might think, and an AMAZING treat to have at home.

World's Best French Onion Soup

Sure, French Onion soup is an amazing starter in any Steak House.  But what if you're curled up in front of your fireplace on a cold winter night?   Wouldn't it be awesome if you have some amazing homemade French Onion Soup in a crock in your lap, with all of that stretchy cheese?  Let's do this!

You Will Need:

  • 1 Glop Extra Virgin Olive Oil
  • 4 large yellow onions cut "spoon sized"
  • 4 large Vidallia (sweet) onions cut "spoon sized"
  • 1 cup chopped Shallots 
  • 2 sticks butter
  • 1 cup flour
  • 2 large Leeks cut 1/4"inch thick (Just the white and light green parts)
  • ¼ cup bourbon
  • ¼ cup Port wine
  • 4 cups Beef Stock
  • 6 cups Chicken Stock
  • Salt and Pepper to taste
 
Start with the onions.  LOTS of onions!  How big is a "large onion?"  If you have 8 onions that are each bigger than a tennis ball and smaller than a softball, you'll be in good shape.  What is "Spoon sized?"  That simply means you need to chop or cut your onions so that each piece will fit in a spoon when you eat your soup.  You don't need to be slurping up dangling onion strings for your soup.  You'll spill it, and you'll look like a chump!  Cut them in half (as shown), then quarter each half, turn the half 90 degrees, and finish with some cuts that will produce a pile similar to mine, here. 

Next?  Caramelize!  How?  Well, the best way I've found is to use a traditional electric skillet, like the one my grandmother used to use to fry chicken!  Seriously, glop in your olive oil and pile all of your onions and shallots (save the leeks for later) into the skillet and set the temp to 325.  Set a timer for 10 minutes and stir.  Repeat every ten minutes until they're nice and golden brown.

As they caramelize, they'll cook down.  Don't for a minute, think that you have "too many onions!"  You have a fine pile of onions, and it's "Onion Soup" after all, so calm down.

While you're caramelizing your onions, dump your leeks into a bowl, give them a pinch of salt, and pour in your bourbon and port.  Why?  Because leeks, shallots, garlic and other members of the onion family have loads of alcohol soluble flavors!  Leeks are a bit "tougher" so let them soak and let the salt and the booze work on them.  It will take at least a half-hour to caramelize your onions, so give the leeks something to do during that time.

When your onions are done, dump them into the bowl with the leeks and set them aside.  Put two sticks of butter into a big soup pot (Yes, two sticks.  It's FRENCH Onion Soup after all, and the French start, finish, and meander through their days with BUTTER), turn the heat to medium high, and add the flour.  Stir and melt and stir until you have a nice blond roux.  
 
A quick note about roux:  Roux is simply a mix of fat and flour.  It has thickening power and flavor and texture and it's just marvelous in soups, gravies, and sauce, so it's worth your time to get good at it!  For example, mix 1Tbsp of turkey fat/drippings, and 1Tbsp of flour, and you'll have a roux that will turn 1 Cup of chicken stock into amazing Turkey Gravy!  The longer you cook and stir a roux, the darker and more flavorful it becomes, BUT the less thickening power it retains.  In this case, we're using a roux that is very common to soups and sauce, a simple "soft" blond butter roux!

When the roux is nice and smooth, dump in your huge bowl of onions/leeks, and stir.  Dump in your stock (yes, ten cups, mix of beef and chicken), bring the heat to high, and stir, stir, stir!  Make sure when you stir that you push all of the roux off of the bottom of the pot!  Then, BTBRTS!  Bring to Boil, Reduce to Simmer.  As soon ash she starts boiling, lid her up, and dial the heat down to low so that she's just idling along with a soft simmer.  Let her simmer for an hour or so... amazing things will happen...
Check it out!  The onions have cooked down, the leeks have given their all, and the soup is thick enough to coat the back of a spoon (and your belly).  Now is the time to adjust for salt and pepper!  This will vary depending on the type of beef and chicken stock you used, so season carefully!  There's a nutty depth of flavor, and a silky texture that smells and tastes like buttery onions!  
 
Now, kill the heat, put the lid back on, and turn your attention to serving, but first, turn on the broiler in your oven, and let it preheat...

You'll need some crocks for serving, and a giant crouton for each crock, to support a platform of cheese.  Where do you get these croutons?  Easy!  Start with a slice of bread (I like sourdough for this), place the bread on the counter, flip your crock upside down and, using it like a cookie-cutter, press and cut a crock-shaped crouton out of your bread, then put the bread into your toaster.  Voila!  The perfect crouton!
Top your crouton with a flavorful melting cheese.  I like a mix of Swiss and fresh grated Parmigiano Reggiano.  Havarti and Gouda work too, or smoked Provalone!  Heap on the goodness and place the crock(s) onto a cookie sheet and slide them under the broiler.  DO NOT MOVE!  Watch them like a hawk because the melting and browning will happen FAST and you don't want to burn this!!  
When it looks like THIS, you're ready to serve/eat!!  Don't forget to peel and eat the crunchy cheese bits from the edges of the crock, that's the best part!  Well... almost the best part!  Enjoy!