Wednesday, November 5, 2025

Beef Wellington (Re-visited)!

I've made Beef Wellington in the past, and it's a very impressive looking dish!  I am convinced, however, that while it's delicious; it just isn't as good as it looks or as the work you have to put into it.  If only it were easier!?  Well, I tried a new version of this dish for Men's Night last week, and the fellas were only too happy to be my guinea pigs!


This dish is still a bit challenging (I give it a 7/10 for "time and trouble"), but it was worth it!

You Will Need

  • 4 8oz Beef Tenderloin Filets
  • 1 Large Pack of Whole Portabella Mushrooms
  • A few Tablespoons of Yellow Mustard
  • Several Slices of Prosciutto 
  • Several Thin Slices of Bacon
  • 6 Cloves of Fresh Garlic
  • 1 Stick of Butter

This recipe starts with the mushroom "Crumble."  Simply dice your 'shrooms into the tiniest bits you can (I used a food processor and pulsed them into oblivion), and cook them with the butter and garlic (and maybe some red wine) until the liquid reduces and they're delicious.  Set them aside to cool.  Once they've cooled, they'll have the consistency of couscous or mashed potatoes; this is a GOOD thing!

Now; grab of your filets and brush some yellow mustard onto the top and sides.  This is the "glue" that will hold the mushroom crumble. It will cook away, so don't worry about it!  It's entire job is to help stick the shrooms to your meat.  I had doubled this recipe and I was working with 8 filets.  Your mileage may vary...

Here's the "fun" part; using your fingers, grab up some mushroom crumble and press and moosh it all up and around your filet.  You can see in this picture that I was working the filet while it was sitting on a slice of prosciutto.  This is key to the next step...

Here's your goal!  You want to get the filet coated with shroom goop, wrapped tightly in a sheet of prosciutto, and then wrapped in bacon!  Don't worry, it's gets easier as you go.  

Once all of your filets are wrapped, place them onto some plastic wrap and roll/wrap them up SUPER tightly before parking them in the fridge. Leave them in the fridge for a few hours (or even overnight).  The object here is to use the chill air to firm these up into tight little balls that stay together.  

When it's time to cook (not before), take the steaks out of the fridge and unwrap them.  You'll notice a huge difference in their desire to stay firm and wrapped!  Working quickly, place them on the "cool" (indirect) side of a solid fire in your grill OR place them into a pre-heated smoker at 300 degrees F. 

I cooked mine to an internal temperature of 115 degrees, then I seared each one of them over the direct flames on the HOT side of the smoker's firebox, just to add a nice crust.

They were amazing.  Slicing them open revealed a true Medium-Rare center and a nice ring of mushroom paste. The salty prosciutto gave it a perfect balance and the bacon, well?  Who doesn't love bacon?

Wednesday, July 23, 2025

Easy "One Pan" Roast Chicken & Veggies

 Don't we all want something that's "Restaurant Quality" and easy at the same time?  Something that doesn't require the washing of a bunch of pots and pans?  Well, THIS IS IT!


How about a whole roast chicken dinner with vegetables for 4 or 5, with no washing at all?  Let's do this!!

You Will Need:
  • 1 Whole "Frying Hen" (3-5lb chicken)
  • Your Favorite Chicken Seasoning 
  • 1 9x13 pan
  • 4 or 5 handfuls of coarsely cut vegetables 

Set your oven to 375F.  If your oven has a "Roast" or "Convection Roast" setting, this is the perfect recipe for it, so I recommend that setting if you have it.  Also, look at the label on the packaging for your chicken.  Make a note of what he weighs.  He'll cook for 15 mins per pound so you'll need to do some math.  For example if it weighs 4.8lbs, 4.8 x 15 = 72 so he'll cook for 72 minutes.  

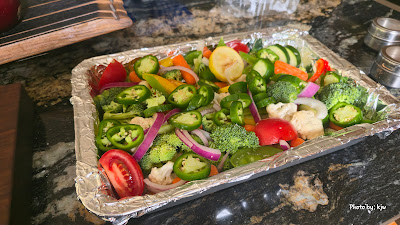
Take out a 13x9" pan and cover the bottom and sides with some heavy-duty foil.  Use two layers if you accidentally split it when you're pushing it into the corners (I hate that)!  Take your time here, because it will save you having to wash it in the sink later!  Now cut and fill the pan with a bunch of vegetables.  It doesn't matter what kind, as long as they fill the pan.  I used zucchini, yellow squash, red onions, carrots, broccoli, cauliflower, tomatoes and jalapenos!  Cut them coarsely and just dump them in!  Season with salt & pepper to taste.  Resist the temptation to drizzle any oil over them, because that's what the chicken is for...

So far, so good right?  Now grab your chicken and rinse it in cold water.  If you have any "misgivings" about handling raw chicken, now is the time to get over it!  Take a deep breath and get some shears and cut the backbone out of the chicken.  I like to eat the backbone so I put mine on the left side of the veggies, in the pan.  Spread the chicken out so his arms and legs are splayed in such a way that he looks like he's doing some "jumping jacks!"  Congrats, you've "Spatchcocked" a chicken!  Lay him across the pan on top of your vegetables.

Grab your favorite seasoning and sprinkle it all over the top.  You can use a good BBQ rub, Poultry seasoning, Cajun Seasoning, whatever.  Personally, I like Tony Chachere's Creole seasoning for this.. You do you!  Now slide the whole pan into the oven and set a timer for 15 mins per pound (or to in internal temp of 165 if you're using a thermometer probe.  I recommend the probe if you have one).

When it's done, your kitchen will smell terrific and all you have to do to serve is pull the pan out of the oven, use your sheers to cut the chicken into however many pieces you want, and use some tongs to scoop everyone a healthy portion of veggies!   The chicken fat helps marinate and cook the vegetables, they'll be "roasty" and juicy and delicious!  The chicken will be great and juicy as well.  Once everything is gently removed from the pan and onto plates, pull the foil out of the pan and if you've been fairly careful, the pan will be clean and ready for the next chicken!

Wednesday, May 14, 2025

Super Easy Blackberry (or Blueberry) Cobbler

So after our annual volunteer Pancake Breakfast, I found myself staring at a huge bag of leftover blueberries.  What to do.... Then it hit me, COBBLER!  Oh yes, Blueberry Cobbler!  I only had about an hour before the fellas showed up for Men's Night and BBQ so I had to do this quickly:


You Will Need:

  • 2.5 Cups Berries (Blueberries, Blackberries, Raspberries, they all work)
  • 1 Cup Sugar
  • 1 Cup Flour
  • 1 Cup Whole Milk
  • 1 Stick Unsalted Butter (melted, then cooled slightly)
  • 2 Tsp Baking Powder
  • 1/2 Tsp Salt
  • 1 9x9 deep dish baking pan

This recipe is super easy, but you can't take shortcuts.  Sorry!  Here are the steps:

  1. Preheat your oven to 375 degrees F.
  2. Get yourself a decent sized bowl with a tight lid (tupperware works) and dump in your berries and sugar.  Gently stir, put on the lid, and shake and roll it gently to get everything mixed together.
  3. Park the bowl in the corner of your counter at room temperature for at least an hour.  Yes, an HOUR!  The sugar needs to chew up the berries a bit, and then dissolve. When the sugar is gone and you have a bowl of berries in syrup, you can proceed to step 4.
  4. Whisk together the flour, powder, and salt.
  5. Add the milk to the flour mixture and whisk it together until it looks like thick cake batter.
  6. Add the melted butter and whisk to incorporate. 
  7. Smear some butter around the bottom and sides of your pan and pour in the flour mixture.  Get it ALL in there!  Use a silicon spatula if necessary.
  8. Pour the berry mixture over the top of the flour in the baking pan, and use a spoon to gently stir and mix it around.   BE GENTLE!  Your goal here to get a mix of batter and berries that's fairly even.  Don't stir it all into a big purple goo...
  9. Now Bake for about 40 minutes.  The top will be nice and golden brown.
  10. Scoop out a portion and dump some vanilla bean ice cream over the top.


MY OH MY, SHO' AM GOOD!!!  Look at that, exactly ten steps!  We can call this, Ten-step cobbler...