Friday, April 25, 2014

Four and Twenty Blackberries Baked in a Pie!

"Friday" rhymes with "Pie-Day" so today I bring you a "Sour-Cream Blackberry Pie!"  Don't let the name fool you, this pie is tart, sure, but it's anything BUT sour!


You Will Need:
  • 1 Frozen Pie Crust
  • 1 Cup (8oz) Sour Cream
  • 3/4 cup sugar
  • 3 TBSP A/P Flour
  • 1/8 teaspoon salt
  • 3 Cups FRESH Blackberries (or a 16oz frozen bag of blackberries, but the fresh berries are so much better that I hate to even mention this option, so forget I ever brought it up)
NOTE: Frozen pie shells come in packs of two, so why not double the recipe? 


This is the easiest pie you will ever bake.  In fact, you'll spend more time managing the pie-crust than you will making the pie.  This pie doesn't bake at a very high temperature, so you'll need to par-bake the crust to give it a head start.  Thaw the crust thoroughly so that it's at room temperature, then dock the bottom and sides with a fork to vent any steam.  You don't want giant air-bubbles in your crust, so use the fork to poke holes in the bottom and the sides!  Bake the crust according to the directions it comes with, but only for about 3/4 of the specified time.  It will be "tan" but not quite "golden brown."  When the crust is done, set your oven to 350 degrees, in anticipation of the pie that will be in there, soon.


Now, for the pie filling... Plop the sour cream, sugar, salt, and flour into a bowl and stir it together with a paddle or spatula.  The sugar will take some time to dissolve and you don't want gritty filling so... really beat the crap out of it!  BEAT BEAT BEAT!!  Let it sit, covered, in the refrigerator for 1/2 hour and taste it.  The sugar should be completely dissolved and your brain should tell you, "Hey, this would be a downright spectacular fruit dip to serve with berries and cut melons!"  When that happens, you'll be ready to add the blackberries!  Dump them in there and gently stir them into the mix.  

You could stir the berries more violently, I suppose, if you want some of the berry juice to mix with your filling, but I prefer to let the heat in the oven "pop" them open.  If you do crush the berries during the stir, or if you used frozen berries, you'll have a purple pie.  That's not a bad thing, but some people might be averse to purple food.  The only purple food I ever ate was Poi, in Hawaii.  I don't recommend it.  In fact, I think I'd recommend that you eat the sand on the beach before you try to eat Poi.  Nasty stuff, that.


Pour, fold, and scrape every ounce of goodness from your bowl into your pie crust.  Gently mash the berries into place using your spatula and make sure the filling oozes into the gaps.  If you're persnickity about how the pie will look when it's done, you may want to gently pluck out and rearrange some berries so that things look a bit more "even" to your anal-retentive self.  In any case, you're ready to bake!  With the oven set to 350, place a pie in the center rack, and let it bake for 50 minutes.  Baking two berry pies at one time can be a bit unpredictable so I chose to bake mine one at a time.


The heat of the oven will pop the berries and set the filling.  If you jiggle the pie, it might "dance" a little bit, but it should be noticeably more firm when it was when you slid it in there.  Also, there should be some berry juice highlighting the pie with accents of bright purple here and there.  You'll need to resist the temptation to just eat it with a spoon at this point.  Set the pie on the counter to cool.

I recommend a modest scoop of Rocky-Road ice cream with this pie.  The marshmallows tie-in the texture and the chocolate adds a nice contrast.  The nuts don't hurt, either!

Tuesday, April 22, 2014

Portobello Blues

CAUTION, this recipe has a "Vegetarian Option" in deference to my good friends Scott and Shelly.  It is appropriately labeled so you don't have to read it, if you don't want to.

Recently, the upper Northern regions of MN experienced a great loss when the owner of the Foundry Tavern in Cloquet stopped making/selling her famous Blue Cheese dressing.  It was always my intention to get some of that white gold and to stuff some portobello mushroom caps with it, but somehow we always managed to eat it all before I could get around to buying the mushrooms.


With the incredible flavor of her chunky dressing burned into my head, I set out to duplicate it, and to stuff some mushrooms with it, and to wrap them with bacon!

You Will Need:
  • 15 "Baby Bells" Portobello Mushroom Caps
  • 1lb of Thick Bacon
  • 2 Cloves Garlic, Peeled and Minced
  • 1 8oz block of cream cheese, softened
  • 1/4 Cup Half and Half
  • 4oz Blue Cheese Crumbles
  • 2Tbsp Chopped Fresh Chives

Get things started by dumping the garlic, cream cheese, half and half, chives, and blue-cheese crumbles into the bowl for your mixer. Use a paddle attachment and start it up, low and slow.  When things first start to come together, the mix will look wet and sloppy and you'll think, "There is no way this is going to work," but stick with it.  When things are combined, bring the speed of the mixer up to medium for at least two full minutes.  Sprinkle in some salt and pepper.  This will set up into a gloriously thick and delicious blue cheese mixture and you'll be tempted to just eat the whole batch with a spoon.


Now, pull the stems out of your baby bellos and use a small kitchen spoon to stuff each cap with cheese.  Be generous. While you're doing this, start to contemplate the wine you'll need for this dish.  I think "Cab Sav" when I cook portobellos, but that might be because I usually serve them alongside a thick New York Strip.  You have an awesome blue cheese to think about, and bacon is coming too!  Personally I don't think you can go wrong here, when it comes to a wine selection.  Perhaps my friend Tim (California man with a nose for the grape) will comment with his ideas.  Drizzle some olive oil onto a small steel pan (or cookie sheet, if you want to use your oven, rather than the grill) and line up your little caps as you get them stuffed.  If you want to dip the mushroom stems into your cheese to snack on while you do this, I will not be there to stop you...

Now, using some kitchen sheers, cut your bacon strips in half.  Lay a 1/2 strip of bacon over the top of each cap, and tuck the ends underneath the bottom.  Take care not to squish the cheese out from under the bacon.

**** VEGETARIAN OPTION ****
Using a vegetable peeler, peel some thin strips of eggplant or zucchini as a substitute for the bacon.  The eggplant will take on a very presentable color and will look nice.   It won't taste as good as bacon, but it's probably better for you, if you are trying to live to be 120.

Ok, time to cook.  These little dudes only need to stay in the oven long enough to crisp up the edges of the bacon.  I use my grill, rather than the oven, but the concept is the same; 375 degrees for about 30 minutes.  Hindsight being 20/20, I'm looking at this picture and I'm wondering how marvelous it would have been to hide a thin slice of jalapeno in the base of each mushroom, prior to stuffing?  Your mileage may vary.  Regardless of how you might want to embellish, this is an amazing dish that you will love!

I planned to serve it for Easter brunch but sadly, we ate them all before any of my guests arrived.  Early bird... worm... you know the drill.


Monday, April 14, 2014

Tools You Need, and Tools You Don't

Looking back over the years, I think I've bought, used, tried, tested, and ultimately thrown away more BBQ tools and toys than most people will ever use.  This is not something I'm proud of, but it's knowledge I'm proud to share!


There are a zillion crazy tools out there.  For pity-sakes, do you really need a spatula that says, "MMMmm that looks tasty" every time you flip a burger?  That's the sort of thing that belongs in the garbage, right next to the "Billy-Bass" singing fish that you never should have hung on your wall. Here are the tools that I consider "Essential" and I'll tell you why:

  • Charcoal Chimney
  • Thermapen
  • Remote Temperature Monitor
  • Tongs
  • Seriously... just Tongs
  • Knife / Cutting Board
  • BBQ Grill Mat
  • Non-stick foil

Charcoal Chimneys are awesome!  You can start a giant pile of charcoal in 20 minutes with a single match and two sheets of crumpled newspaper.  Lighter fluid has its place in the world, for lighting bonfires or garbage piles on fire, but lighter fluid should never be used anywhere near food!  Also, avoid the "light the bag" style of charcoal with the briquettes that are saturated in lighter fluid.  The smell of chemicals will permeate your food and that's just bad for all kinds of reasons, chief of which is, "your food will taste horrible."  I burn through a charcoal chimney at the rate of about one per year... They also double as a mini-stovetop if you ever need "jet-engine" heat for Blackening steaks in a cast iron skillet, or if you ever need to sear some sushi grade tuna, rare.

I would be lost without my Thermapen!  The $90 pricetag bothered me, but I thought back and calculated that I'd thrown away at least $200 worth of broken, inaccurate, burned out, and otherwise useless probes and thermometers.  This thing is hyper-accurate and scary fast.  It uses an actual two-wire thermocouple rather than a digital sensor, and the pickup is in the extreme end of the tip so you can literally see what's going on in your food, whether its deep inside a ham near the bone, or just under the skin of a Cornish hen.  Get one.  Most "instant read" thermometers need a minute or two to settle on a final reading.  Any BBQ chef will tell you, you don't want to raise the lid on your pit for two minutes... leaking that kind of heat out will cost you another 20 minutes of cook time on the back end.  This thing will tell you in 3 seconds or less, EXACTLY what the temperature of your food is.  I wouldn't cook without it.

What's so important about a remote temperature monitor?  I believe that the trouble most people have in grill-cooking is knowing when to take the food OFF of the heat.  A chicken breast that is 180 degrees is definitely safe to eat.  It is also dry, tough, and something I wouldn't serve to my guests.  A chicken breast that is 165 degrees is equally safe to eat, and will be super tender, juicy, and talked about long after the meal is over.  For bigger meats, most connective tissues don't completely break down until they reach 180 degrees.  Briskets and Pork Shoulders are done and safe to eat at 140, but they don't reach their optimum textures and "pull-apart goodness" until they touch 190, deep inside the muscle.  The only way to know for sure when your meat is delicious, but not burnt, is to jab a probe into where it counts and to watch it.  My ThermoWorks remote monitor has two inputs for two probes, so I can monitor two cuts of meat at the same time.  It also has alarms to let me know when things are close to being done.  The newer version of this monitor has bluetooth and will talk to your home wi-fi so you can use your cell phone to monitor the grill and food temperature from anywhere in the world!  This is useful for getting you out of the ballet or the opera with your wife... "Honey, the ham is done, I got to GO!"

I use Tongs.  I don't use spears, spatulas, claws, mitts, gloves, forks, or pokers to handle my food while it's on the grill.  There are several reasons for this, but mostly it's because I don't want to poke any more holes in my food than is absolutely necessary.  Nothing will ruin a good link of sausage more quickly than jabbing holes into it to let all of the juice run out!  If your burgers are too "stuck" to the grill for you to use tongs to flip them, then you shouldn't be flipping them yet, anyway, so a spatula wouldn't help you.  Get yourself a nice pair of long stainless steel tongs (NOT silicon, because silicon won't grip your food and that's the whole point) and start using them!

I am just amazed, every time I ever help a friend grill, at the complete lack of cutlery I encounter in most of their kitchens.  Lots of people have "that one big knife we got from our wedding" or from Uncle Fred or whatever, and it's usually in a drawer somewhere with some rust on it.  *SIGH* get yourself a good knife!  Bigger is not better, "Sharper" is better, so spend some money on a knife with good steel, that will hold a good edge, for a long time.  Do NOT get an "eversharp" or other knife that "never needs sharpening!"  If you look closely at these knives, they have serrated edges (like hacksaw blades) that will cut almost anything (even nails and metal), but they'll tear your food up.  You want "slices" of things, not "hacked portions" of food adorning your serving platters.  Spend some time in the store handling different kinds of knives, because every hand and every preference is different.  I like German knives, they tend to be a bit heavier (I like that) and they are balanced well in my hand.  Your mileage may vary.  Also, get yourself a good, heavy, stable, cutting board.  You don't want it slipping around your counter while you have a sharp knife in your hand, and you want it big enough to hold that 18lb brisket.  Get a nice one and you'll be surprised how often you use it.

I find a new use for my BBQ Grill Mat almost every time I use it.  Here it is in action, with a mess of sliced onions in oil, salted, and smoking away in the corner of my BBQ pit.  These mats withstand some extreme temperatures, they're non-stick, and they keep food from falling through the cracks.  How versatile are they?  I've "fried" chicken wings on mine, cooked bundles of asparagus, mushrooms, fajita peppers, and I've even smoked corn casserole and other food that you wouldn't ordinarily plop onto the hot grill grates to cook.  Mine just "lives" in the grill.  I don't take it in for washing, simply because it heats up to 500 degrees every time I use it.  Wipe it down once in awhile.  You can also cut it down to a small size or "round it off" to match your grilling surface, if you want to.  Find them on Amazon.

Last on my list is non-stick aluminum foil.  Grilling usually means "sticky."  Whether tis a dry rub with brown sugar or a bbq sauce that you mop onto your food, most things that come off the grill like to stick to other things.  Aluminum foil that has been treated with a non-stick surface is a miracle of modern technology!  Use this one time on a stubborn sticky food and I promise, you'll never buy regular foil again!  Want to bake/smoke your bacon on the grill?  Non-stick foil.  Don't want to leave your Salmon skin stuck to your grill-grates so that food from your cooker tastes like fish for the next week?  Non-stick foil...

Do you have a favorite tool you think I should be using?  Leave you comments here!  I'm always up for more!


Thursday, April 10, 2014

Secrets of Salmon

Grilled Salmon is a very popular dish in restaurants, but it's feared at home.  Why?  Lots of reasons...

"Doesn't it stick to the grill?  How do you flip it over?"
"What about the skin?  Should you grill it or remove it?"
"How do I know when it's done?"
"A whole filet of salmon is too expensive to ruin on a hot grill!"

Fortunately, deliciously grilled salmon is super easy and I'm here to share a few secrets that will, hopefully, inspire you to try it!

You will need:
  • 1 Whole Filet of Salmon (Skin ON)!
  • Dry Rub for the fish (equal portions of each):
    • Sea Salt
    • Brown Sugar
    • Smoked Paprika
    • Fresh Dill (chopped fine)
    • White Pepper
  • Olive Oil
  • Lime Juice
  • NON-Stick Aluminum Foil

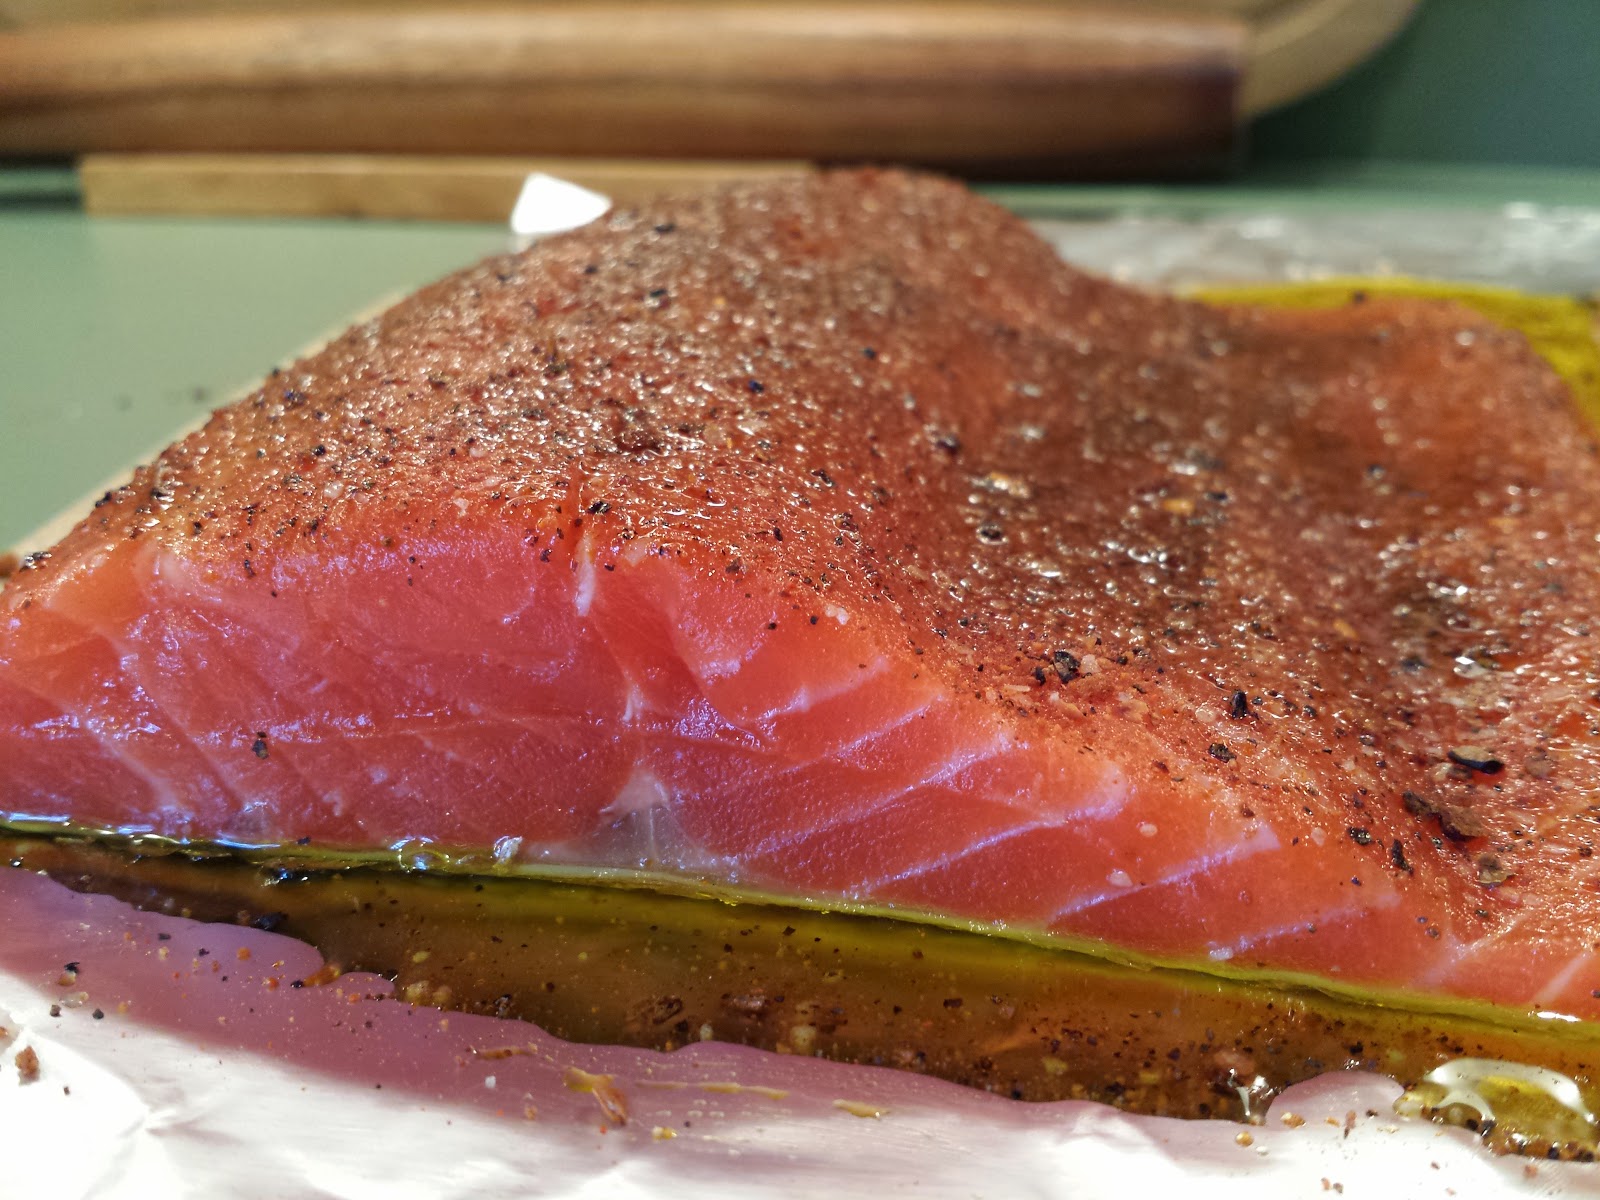
Stretch out a length of foil that is 2x the length of your fish, and double it over.  You'll want two layers of foil under the skin of your fish when you slide it onto the grill.  The answer to the question, "How do I turn the fish over without it sticking to the grill?" is simple; Don't turn it over!  Burp some olive oil onto the foil and lay your salmon (or any other fish, really) on top.  Slide it back and forth a bit to lubricate everything well.
Pour a tablespoon (or so) of olive oil into your hands and rub down the salmon filet.  You want enough oil on the fish to "hold" the rub, but you don't want so much that it saturates the fish.  Squeeze the juice of 1 lime into a small bowl and add a liberal amount of your dry rub.  Mix the paste well and rub it all over the fish.  The acid in the lime juice will actually "cook" the flesh of the fish a little bit, and color the meat a whiter shade than the surrounding area.  So; you don't want to have heavier concentrations of it on some parts of the filet, but not others.  Be as "even" as possible in your application of the lime & rub paste.

Now let the salmon sit, unmolested in a dark corner, while you build your fire.  The fish needs to be at room temperature when it hits the grill, so be patient.  It will darken in color and some moisture will leach out of the fish... this is normal.  You'd leach moisture too, if I covered you with salty lime juice!

Once your fire has warmed up and the grill is pre-heated, carefully slide the foil off of your cutting board and onto the cool side of the grill.  Grab the corner of the foil with some long tongs, and slide it over to the hot side.  You'll notice that non-stick foil is SLIPPERY, so it will slide easily all over the grill.  It will also slide right off of your cutting board, too, so don't drop the fish! Close the lid to the grill for 7 minutes.  Let the smoke flavor the fish and let some heat build up to "bake" the filet. 

After 7 minutes, lift the lid and check on it.  Several things are happening at this stage:
  • A light crust will be developing on the top of the filet, and the rub will darken in color
  • The oil will be bubbling around the edges of the fish, this is normal!  The double layer of foil and the skin on the bottom of the filet will protect the meat from searing or burning.
  • The meat is slowly coming up to temperature.
If you want to cook it a bit more slowly, and you want to add some more smoke flavor, simply slide the fish over to the cool side of the grill and close the lid.  The inside of your grill should come up to 400+ degrees and now you're essentially "baking" your salmon in a nice smoky environment.  Check the fish's temperature every 5 minutes or so.

When the inside of the fish hits 140 degrees, it's time to pull it off the grill.  Slide the filet off of the foil and back onto your cutting board.  gently, slide a knife under the skin on the bottom of the filet.  The meat should slide right off of the skin, in one whole piece, easy peasy!  Slice the filet, cross-ways, to portions of your choosing.  The meat should be firm, opaque, tender, and DELICIOUS!  Serve with a slice of lime and some fresh dill to garnish.